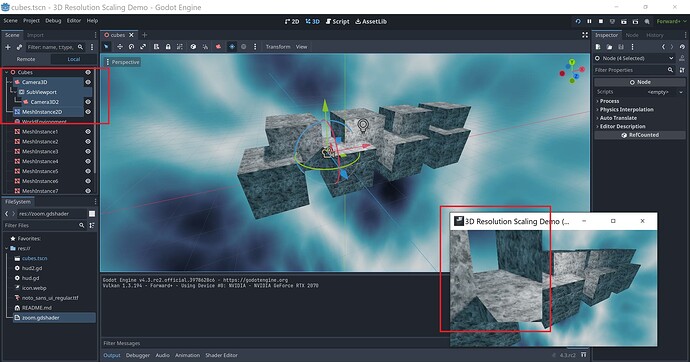
I got you something to work with. I have gotten it to the proof of concept phase, you will need to take it the rest of the way.
First, setting up the scene:
Root Node3D
|_ MeshInstance2D (note this is 2D not 3D...this will display the zoomed in image)
|_Camera (your main camera)
    |_ SubViewPort (this will render the screen at a different resolution)
         |_ Camera (this is the Camera for the subviewport....it should be set identically to the main camera)
Set the Mesh of the MeshInstance2D to a new quad mesh. Edit that quad mesh and set it to some size. I chose 256 x 256 as I didnt want it to take up the whole screen for dev purposes.
Go to the 2D layout and position it so the whole thing is somewhere on the screen. I put it in the top left.
Now, for the MeshInstance2D change the material to new ShaderMaterial (it is under the canvas item group). Now edit that shader. Note that a shader and a shader material are two different things, we need both.
In the shader select “new shader”. we are making a canvas item shader.
here is the shader code:
shader_type canvas_item;

uniform sampler2D viewport_texture : source_color;
uniform vec2 rect_start = vec2(0.0, 0.0);
uniform vec2 rect_end = vec2(1.0, 1.0);

void fragment() {
    // Calculate the size of the selected rectangle
    vec2 rect_size = rect_end - rect_start;

    // Normalize the current UV coordinates to the selected rectangle
    vec2 normalized_uv = (UV * rect_size) + rect_start;

    // Flip the y-coordinate calculation
    normalized_uv.y = rect_end.y - (UV.y * rect_size.y);

    // Ensure we're sampling within the texture bounds
    normalized_uv = clamp(normalized_uv, vec2(0.0), vec2(1.0));

    // Sample the texture
    vec4 texture_color = texture(viewport_texture, normalized_uv);
    COLOR = texture_color;
}
Now save and go back to the ShaderMaterial.
You should see “shader parameters”. Expand that section.
You should see all the settings we can pick to adjust the zoom and such.
FIRST expand the “resource” section and make it local to scene. THEN under the shader parameters set the viewport texture to the viewport we set up earlier.
VOILA!
Now to explain how to use it…
The Shader parameters you will need to adjust to affect the zoom are rect start, and rect end. This is the top left and bottom right corner of a rectangle within the viewport texture you want to expand. The coordinates go from 0 to 1. so 0.25 would be a point 25% along the axis of the texture.
The SubViewPort size controls the resolution of the texture…you can upscale or downscale compared to your other camera. IT has its own resolution.
The position of the MEshInstance2D is, obviously, where this zoom portal appears. But the size of its mesh (remember the quadmesh we made) that is the size of the zoom window on your screen.
This is everything you need.
You can see I have a zoom window that is zoomed in on part of the screen.
You will probably want to write a decent script to tie this all together. Probably need some script to keep the two cameras in sync. Not everything I did needed to be done exactly that way. This is a proof of concept.
