Always happy to geek around ![]()
Did you implement a way to control the side wall shape? I am using a 2D Curve but that’s a bit annoying to switch between the 3D and 2D editor to change the side wall shape.
2 Likes
I am using this method: https://youtube.com/clip/Ugkx4SJAmAp7lXhAuNM5x-bPOB7d0AQbEWdI?si=-UlGRGD3ZcwEXEHP , it is probably a bit crude but it works. I would be interested in how you use curves though, that would make the walls probably much smoother, or at least use less points to achieve the same result.
2 Likes
Same idea, I tesselate the Curve2D and use the points as reference for extruding the vertices:
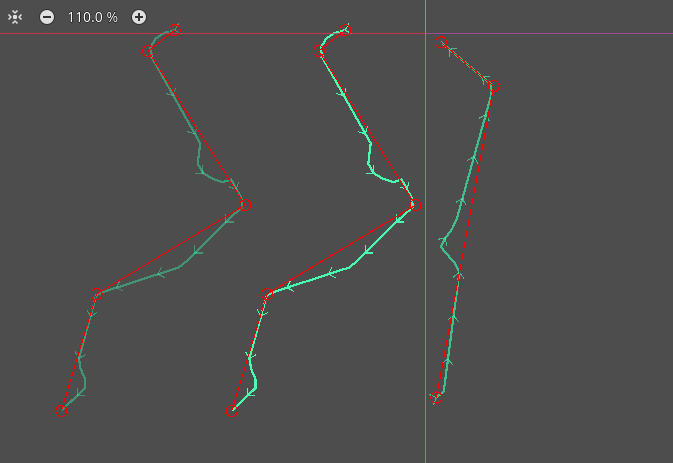
The red polygon is based on a selection of the control points and serve as a base for a simpler collision mesh.
Results (which the collision mesh in blue):
2 Likes
Hello,
I have been working on adding the State machine and animations for the little crabs:

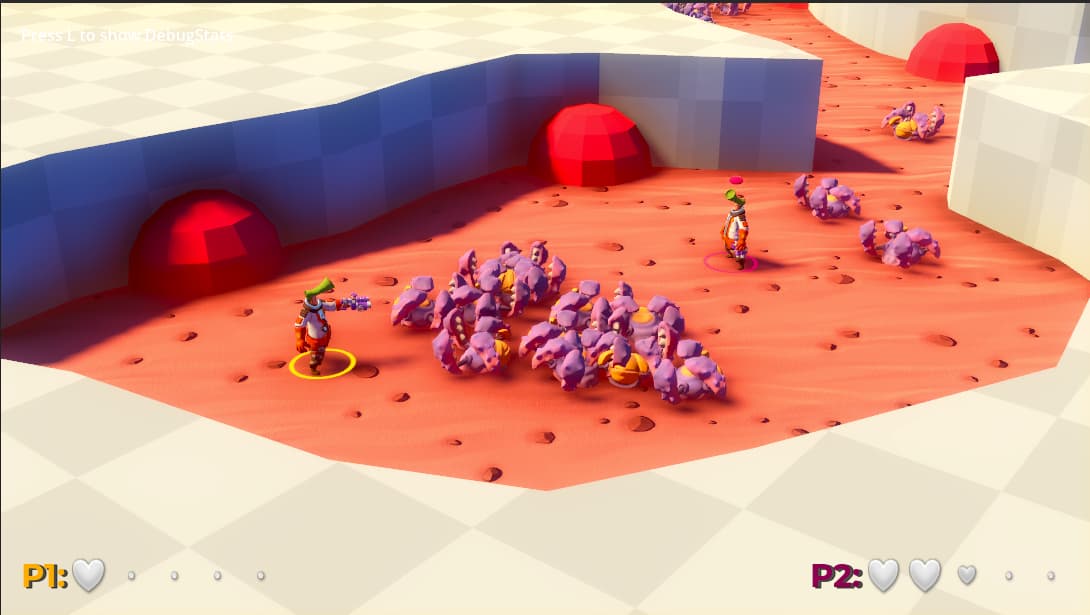
And now that, I have some tools and good assets, I started to work on finding a core mechanic that would be fun for a 2 players game. I started to playtest with my partner.
The idea is that:
- monsters need to be marked before they can be shot with the neutralisation gun
- Players can be in Marking state, where they mark enemies or in Shooting state, where they shoot enemies
- If one player is in Marking state, the other is necessarily in Shooting state
- player Yellow can mark yellow monsters and shoot purple monsters
- player Purple can make purple monsters and shoot yellow monsters

The playtest was promising, but some times, one player will just be waiting for the other to finish shooting. Also, players could not die, so it was kind of altering the fun by making the marking too easy. I will explore a few possible improvements to correct these issues.
5 Likes
Woa! Had a scroll through your thread. This looks truly impressive. Love the flavour. Lovely style and colours. If you’re doing all of this on your own that’s quite badass. With all that skill plow on through! This will be good. Looking forward to see how this continues to grow.
2 Likes
This looks fantastic. I also find it interesting to follow the development, since most people afvice to focus on the gameplay loop first, and then worry about aesthetics. Yet, it seems you’re doing it the other way around, and your game looks absolutely amazing already!
2 Likes
Really enjoying the vibe and character animation progress. John Space is really coming to life!
Quick question though: are you using a Boid simulation for the crabs? If so, that could be a great base for airborne enemies too!
imagine flocks of weird alien flyers swarming with that same dynamic behavior!
Also, just a quick dev note: make sure your state machine has some clear “exit” paths, especially if you’re blending animations or adding transitional logic.
Easy to get stuck in limbo states otherwise.. learned that the hard way myself!
Keep it up, looking forward to seeing more!
2 Likes
The art is so charming! Keep up the great work
3 Likes
Thank you all for your kind words!
It means a lot to me when you spent the time to write and post your feedback ![]()
@do_ob yes I am doing it on my own. I only have 15 hours a week I can really focus on gamedev, so it is quite challeging to pull this art style out! I am thinking to work on a less technically ambitious project from September, once I have some sort of a demo running for this one.
@BFranse yep, to test the gameplay first is often recommended ![]() but here, I really needed to know how a John Space game could look like, whether other people would like it, and how complicated it would be to achieve that art style.
but here, I really needed to know how a John Space game could look like, whether other people would like it, and how complicated it would be to achieve that art style.
What if I spend 6 months polishing my gameplay ideas to then spent 2 year strugging to make the art and realised it is too much for one person?
So basically my approach is to try make a vertical slice so that I have a full estimate of the time spent on all dimensions of the game. Knowing that 3D art is one of the most consuming part, I wanted to estimate it first. And I can confirm: it is very time consuming!
@redflare I am only using the default NavigationAgent from Godot at the moment. But I will be improving the AI whenever I need it for the gameplay/prototype to work. They do need an avoidance system ![]() and flying enemies are definitely going to be part of the game!
and flying enemies are definitely going to be part of the game!
What do you mean by exit path? I think the only exit possible for my creatures is death ![]()
![]() I can share my state machine graph later, if I succeed to make a diagram of it !
I can share my state machine graph later, if I succeed to make a diagram of it !
@willthoven Thanks!
2 Likes
I have worked on a level design before I started to work on the core mechanics, a month ago. Which is really not the right order of doing thing; you should design your level after you’ve nailed the main mechanics ![]() but well, I knew it was meant to be some sort of shooter!
but well, I knew it was meant to be some sort of shooter!
Anyhow, here is the first block of the level that I put together a month ago.
I did a quick playtest in this level prototype and it is not as bad as what I thought. I was worried that the level was not spacious enough to enable the co-op mechanics of marking/shooting. But it was fine! So I should be able to use it with just a few tweaks.
This being said, this week I am actually working on adding some juice to the game. I reckon that the core mechanic loops (e.g. getting rid of enemies with marking/shooting) will always feel dry if there is not a minimum of juice in the smaller loops (e.g. shooting feeling satisfying).
Hence I started to add a flashing material when an enemy is hit or when the player is hit:
3 Likes
Here is the code for making enemies blink by the way:
var flash_overlay:StandardMaterial3D = preload("res://enemies/flash_material.tres")
var cached_overlay:StandardMaterial3D
var flash_tween: Tween

func play_flashing_material():
    #TODO:kill tween after death animation is done
	if flash_tween != null:
		flash_tween.kill()
		main_mesh.set_material_overlay(cached_overlay)

	cached_overlay = main_mesh.material_overlay
	flash_tween = get_tree().create_tween().set_loops(1)
	#we use get_tree so that the tween finishes even if creature is dead
	main_mesh.set_material_overlay(flash_overlay)
	flash_tween.tween_callback(
		main_mesh.set_material_overlay.bind(cached_overlay))\
	.set_delay(0.05)
	flash_tween.tween_callback(
		main_mesh.set_material_overlay.bind(flash_overlay))\
	.set_delay(0.05)
	flash_tween.finished.connect(
		main_mesh.set_material_overlay.bind(cached_overlay))
You can make them flash twice by changing .set_loops(1) to .set_loops(2).
Note that as this is a prototype I did not bother to make sure the tween is queue_free after the enemy finishes its death animation.
Hello here! I have been working on Game Juice:

Mainly adding:
- recoil animation on both marking (small) gun and shooting (big) gun
- particle effects on impact for the projectiles of the big gun
- VFX for the projectiles of the big gun
- screen shake when shooting with big gun
- screen flash when player are hurt
- tried screen freeze when enemy are hurt, but I dropped it, I found it too disturbing
Do you use screen freeze in your projects? how many milliseconds do you freeze the screen for and in response to what kind of events?
6 Likes
Small update! I have added yet a little bit more juice to the Large Weapon (the shooter):
- better particle effects of the projectile impact (dissolve shader)
- particle of crab are flying around on crab’s death
- crab is pulled away on death

4 Likes
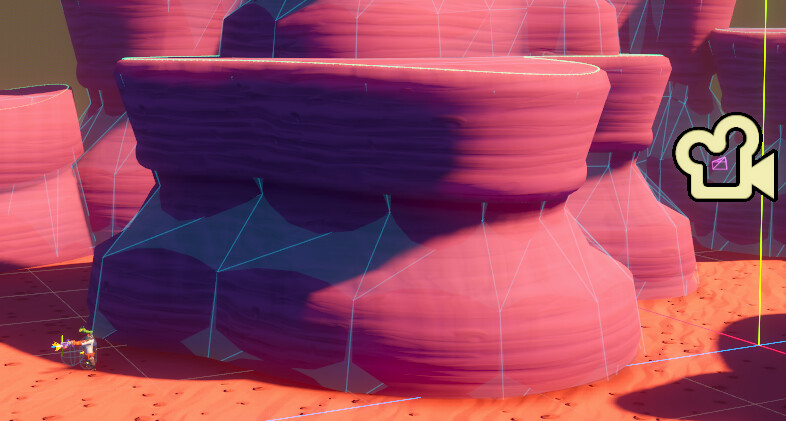
Today’s update, I am working on a new workflow to block my levels using the Skin modifier, Boolean modifier, Solid modifier in Blender.
I think it could be awesome if I make something like that in Godot, so I can edit/create levels on the Steam Deck ![]()

3 Likes
Looks fantastic.
1 Like
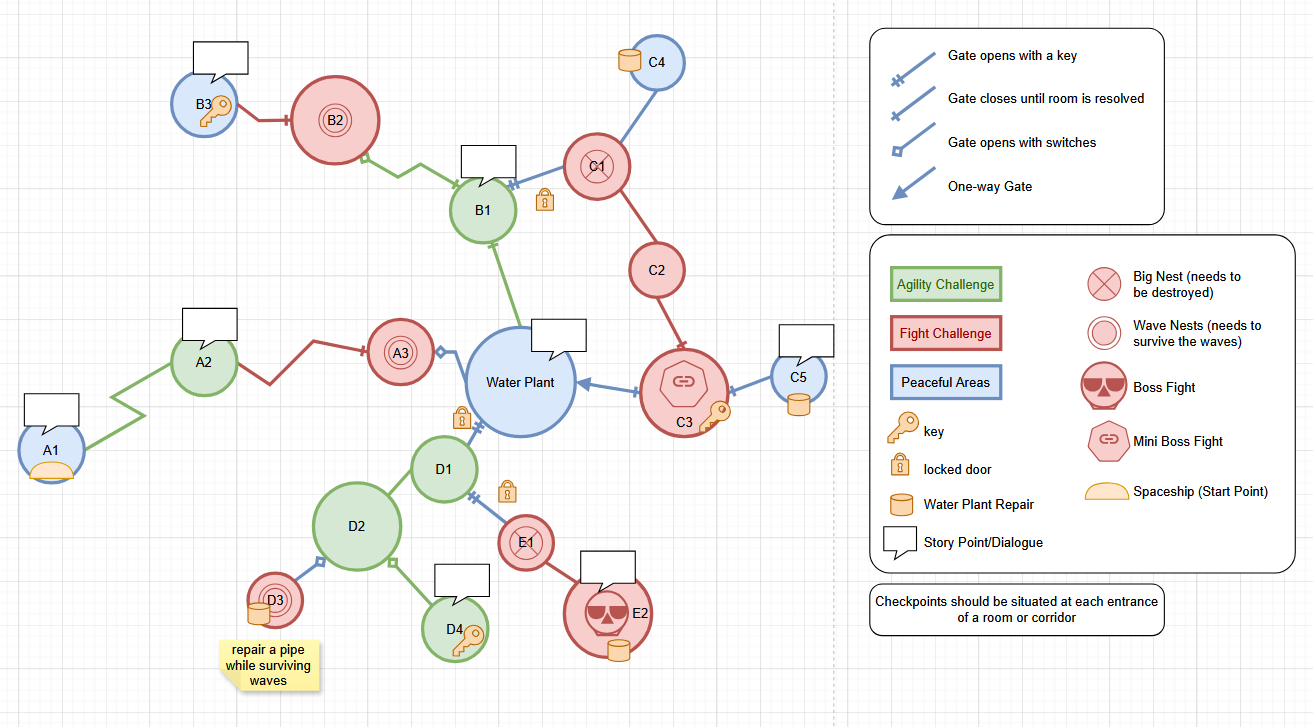
What tool are you using to make the diagram? ![]()
2 Likes
this one: https://app.diagrams.net
Very impressive piece of software.
3 Likes
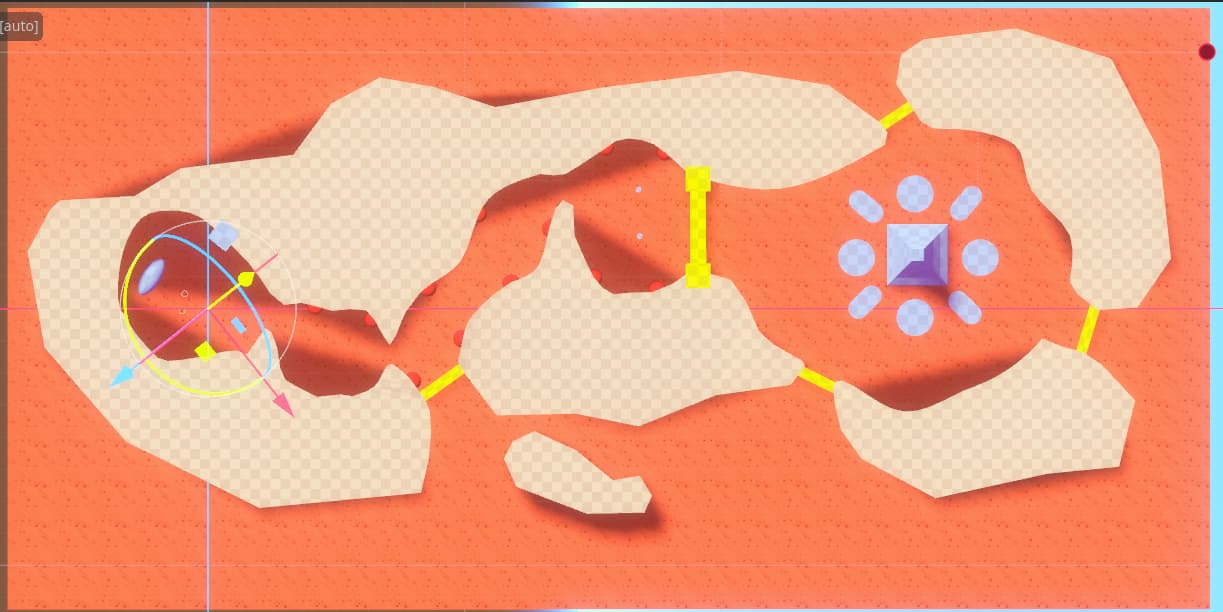
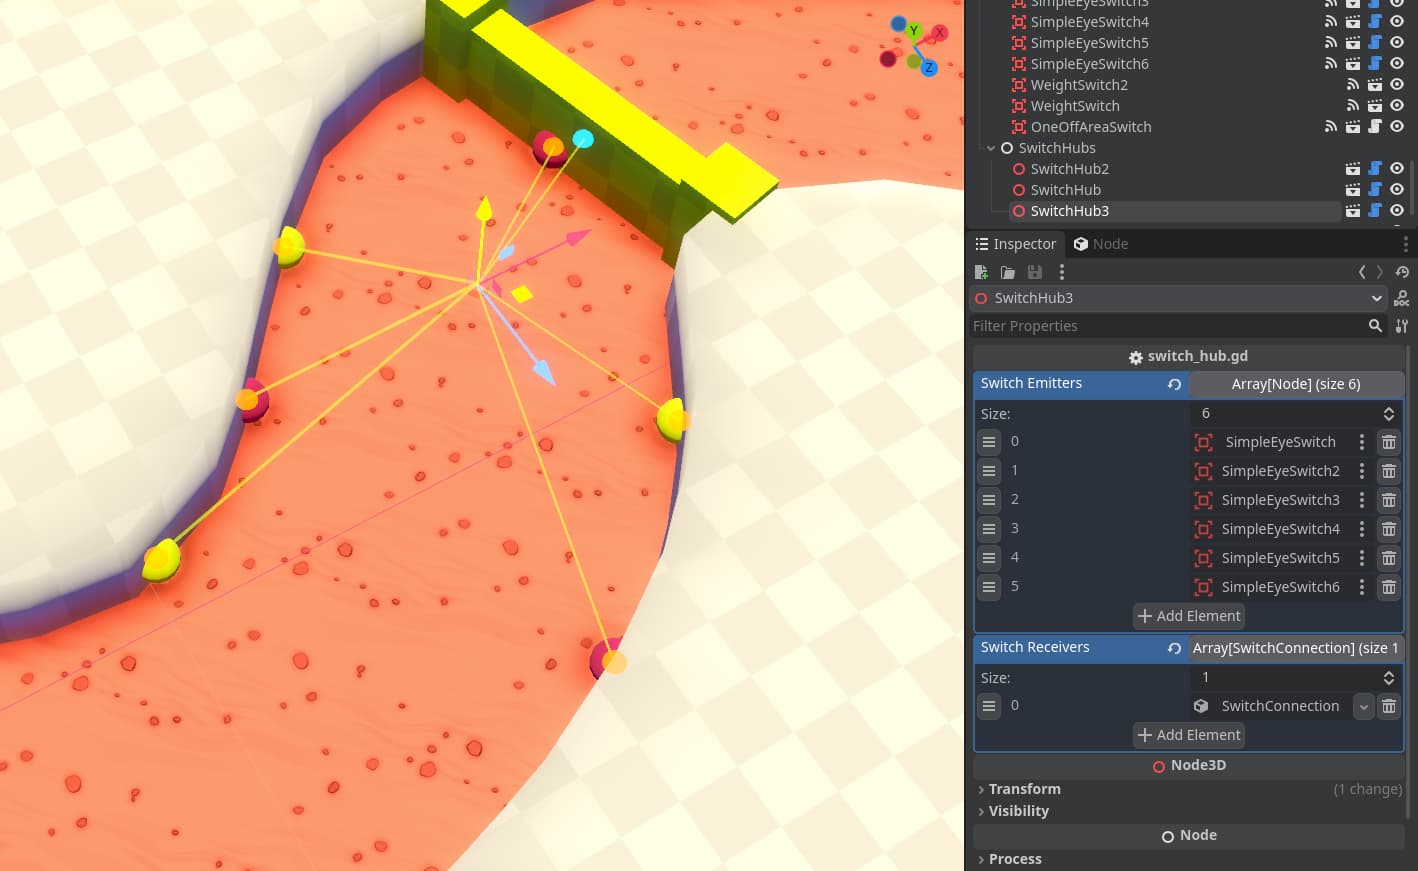
I’m building upon the Switch System I started for the Starter Kit - 3D Top Down Shooter. For instance, I added some visualisation to see the connection between emitters, hubs and receivers in the editor:
1 Like
I have been working on adding a tutorial, with a several small encounters to learn the gameplay like this one:
Or this one which shows the switch system in game:

I also added game tips to remind the players about the gameplay mechanics during the tutorials.
5 Likes