Oh there’s lots of good resources for a game like that. The kind of guides and help you might want probably depend more on your knowledge and experience than anything else. I’ll give you an outline of how I would go about doing all of these things myself.
If you’re a little lost about how to make any of these things work in code, Brackeys’ video on the subject is a gold mine, and there’s a ton of other great resources online. If you want to know about all of the functions and variables a node has that you can use, find it in the official documentation. Each node has some properties and methods (variables and functions available to all nodes of that type), as well as all of the properties and methods of the nodes they inherit from. for example AnimatedSprite2D also has all of the methods and properties of Node2D, CanvasItem, Node, and Object, all of which you can see listed at the top of its page. If you see “Inherited By” just beneath that, you dont have access to any of the methods/propertes of those nodes, but those nodes use the same methods/properties of the node whose page youre on.
Even if that seems a bit obvious (it wasn’t to me at first!) it’s really useful to keep in mind. If you ever want to a node do something that it feels like the node should already have the ability to do (if youre either writing a script for that node or for one of its parents nodes and you’re calling a method on that child node from its parent) its absolutely worth finding that nodes “class” from the docs and looking through whats available for it and the node’s classes it inherits from.
If you want weapons and enemies to be sprites instead of 3d models, that can be done very easily but they’ll require two separate approaches.
For the weapons, create a new node2D attached to your player node, and call it “UI” or “overlay” or something. Then you want another child node2D to that callled “weapons”. make these seperate so its easy to keep the logic behind weapons and other UI elements you might want separate from one another (think things like displaying a message on the screen, or displaying your HP. You’ll want the functions you call to do stuff with the weapons to be separate form all of that. Much easier this way IMO)
then in that “weapons” node you can make an animatedsprite2D for every different weapon you want. make them hidden, and then when you want to take out a weapon/swap a weapon, make a script on your player node to check if you already have a weapons equipped and if you do which one, then hide the weapon if you already have it out and then make the weapon you want to swap to visible by using show().
You’ll want to handle all of the logic for this in a clean way that can keep track of what weapon you have out so youre doing the right kind of attacks. There’s a lot of ways to approach this, but i think as a beginner test way is easily by using a state machine. This is a really good tutorial on the basics for something like that in godot.
For enemies as sprites in the style of GZDoom, you’ll want to use AnimatedSprite3D (not 2d, because you’re using a 2d sprite that navigates in a 3d world). if you want more than one type of enemy you’ll probably want to make your own class.
Just write a script (you dont have to attach it to a node, just have the script somewhere) and at the top itll say something like “extends Node”, you’ll want to replace that with “class_name enemy extends AnimatedSprite3D” or make it extend whatever you want as the base node. now you have your own node type you can find under the AnimatedSprite3D called “enemy”. when you want to make a new type of enemy just make a new scene with your new enemy node as the root, give it a new script (godot might make you want to use the script you made the enemy class in, keep that around but dont use it here), make that script “extend enemy” and thats the script for your new enemy type.
It can do all of the things AnimatedSprite3D and the nodes it in herits from can do AND it can use any of the functions or read/change any of the variables you put in your enemy.gd script, and it will only do call those functions and set/read those variables for its own instance.
lets say you want all of your enemies to have some value for their health, and a hitbox to use when you want to detect if the player has hit them. We can actually set this up in a way so that when you want to make a new enemy type you dont even have to touch the code and can just use the enemy nodes settings in the editor. put something like this in your enemy class:
class_name enemy extends AnimatedSprite3D


var hitbox: Area3D

@export var hitboxshape: Shape3D
@export var health: int


func _ready() -> void:
	hitbox = Area3D.new()
	var hitboxCollider = CollisionShape3D.new()
	hitbox.add_child(hitboxCollider)
	self.add_child(hitbox)
	hitboxCollider.shape = hitboxshape
Then when you save that and you go to your scene with the new enemy type youre working on (using your enemy node) and you’ll see in the inspector you can choose a shape for the hitbox of your enemy, set their health, and whatever other things you want to put in that you want to use (or just have available) for every enemy type. thats what “@export” means, that for every new node we make of that class we can set some variables for it in the editor.
Now, my code isnt the cleanest, but for hit detection to work you need an Area3D, which itself needs a CollisionShape3D to work (these also work if you want to use a custom mesh), and then you need a Shape3D which is going to work as the actual shape the physics engine uses for hit detection.
If this seems a little convoluted, it is, but im not sure if theres a simpler way to do it. I’ll explain it this way. You need to be able to tell when the enemy has been hit, so you need some way of knowing when the hitbox has been entered. Area3D will emit a signal when its been entered by another Shape3D which you can use in code to know when a physics object has been hit and by what, but it cant do that on its own and needs a CollisionShape3D, like our hitbox collider.
Area3D is just a logical thing in code, and not something the physics engine actually knows about, so to use the physics engine (which will be doing the hit detection for us) we need to use a CollisionShape3D. But a CollisionShape3D doesn’t actually have any geometry of its own, its just a class that handles giving mesh data to the physics engine, which is why we dont export it directly, because then the editor will ask for a node that puts things in the physics engine, but not the actual shape itseld.
So we use a Shape3D that gets exported (so we can select the shape we want in the editor). Then when the ready() function is called, we assign out hitbox variable to a new Area3D (because at this point in the code its just a reference to a node, not an actual node itself), then we make a node for it to use in the physics engine (hitboxCollider), add it as a child of our Area3D so we know when it’s collided with and by what, add the hitbox as a child of enemy, and set the collider’s shape to whatever shape we chose in the editor.
Why is all this necessary? Because we need to be able to tell when something has entered that shape, and what. The Area3D node has some signals we can use. Specificlly i think body_entered will be the way to go. In godot, its pretty easy to write a script where a parent node can communicate something to its child just by calling one of it’s functions (for example if we wanted to set the hitbox’s coodinates to something else, we could use hitbox.position(0.0, 0.0, 0.0) to send it to the center of the map using the position method it inherits from node3d). going back up from a child to a parent is… harder.
you could get the node by using NodePath, but if that node is spawned dynamically in the game it wont work, because you wont know where its path will be in run time. you could use find_parent(), but then if you would need to know the name of the parent thats using the area3d, not just its class, and rewrite the code for every enemy type. So the answer is signals.
Signals are another thing I really struggled with, as even though theres lots of good documentation on how they work, it always felt a bit incomplete as again, doing it the way the documentation says means you’ll need to set up the signal and the function it connects to for every enemy type. You can set it up in code, and thats ultimately the best way to do it (when a part of a class), but finding straight forward info on it online was a big pain for me. I have no idea if i was just uniquely confused by everything or if other people felt the same. This right here is the best tutorial I’ve seen on how to do this, nothing else really clicked for me. Even years after finding it I always come back to this tutorial if I need to set up a node and I forgot how.
make your player’s bullets use some kind of PhysicsBody3D (or anything that inherits PhysicsBody3D), then make a function that recieves that type of node as an argument in your enemy class, connect it to the signal from your hitbox, and then when your hitbox detects a hit it’ll give that function whatever node in the scene tree it was that hit it.
something like this:
func _ready() -> void:
	hitbox = Area3D.new()
	var hitboxCollider = CollisionShape3D.new()
	hitbox.add_child(hitboxCollider)
	self.add_child(hitbox)
	hitboxCollider.shape = hitboxshape
	hitbox.body_entered.connect(hit_detected)

func hit_detected(source):
	# lets say youve made a bullet class with a property called "damage"
	if source is bullet: # this notation is for detecting if a node is from a particular class
		health = health - source.damage
If you want this to feel like a GZDoom kind of game, you probably also want to set the billboard property from SpriteBase3D which AnimatedSprite3D inherits from. set it to BILLBOARD_FIXED_Y. Billboarding means taking a 2d sprite in a 3d space, and setting it to always face the camera. BILLBOARD_FIXED_Y is probably preferable to BILLBOARD_ENABLED here, as doom-style games only have their enemy sprites track the player laterally, but not up and down (which is the Y direction in Godot). This is just a preference, but you could do this any way you like really.
So now your _ready() function might look like this:
func _ready() -> void:
	hitbox = Area3D.new()
	var hitboxCollider = CollisionShape3D.new()
	hitbox.add_child(hitboxCollider)
	self.add_child(hitbox)
	hitboxCollider.shape = hitboxshape
	hitbox.body_entered.connect(hit_detected)
	self.billboard = BaseMaterial3D.BILLBOARD_FIXED_Y
at this point you’ll want to start working on sprite animations, this is a good tutorial and there’s lots of good stuff in the tutorials in the official documentation if you havet checked them out already. actually, if you havent already, these two tutorials will give you a really solid foundation as well. Then you’ll want to use an AnimationTree node, which you can learn more about here. I found the animation tree node to be a bit difficult to get my head around until I saw this tutorial. if you only want all of your enemies to have the same kind of animation states (like, one for dying, one for attacking) instead of having a unique set of animations for each enemy, put this code in your enemy class. Otherwise, make your animation tree another export variable and set a new one whenever you make a new type of enemy.
at this point you probably want to be able to start actually using your guns to attack enemies, and make sure theyre taking damage and behaving the way you want them to. There’s plenty of resources out there for this sort of thing, but you didint as about that and this post is already getting big, so I should go over how I would do the rest of these things you asked for.
An inventory system might actually be the simplest part. Make another new class like you did with enemy, but call it something like “item” and make it extend Node3D. You’ll want something pretty simple as the base class for this because an item could hold a wide variety of data, but the most basic thing you’ll want to do with it is place it somwhere in the world, so its going to need to use Node3D’s global_position property. Slap some export variables on there like a SpriteBase3D if you also wanted it to be a sprite, because it also has a billboard property like the AnimatedSprite3D’s the enemies use, and we can use the same visual effect here. Give it a colission shape as well so you can use physics to detect when the player walks over it, again like with the enemy class, but this time you’ll be detecting it from the player because theyre the one who wants data from the item.
I’m assuming you want an inventory system like GZDoom. All you’ll really need to do is tell if the item you’ve picked up is a consumable like a health pack that gets used instantly, a resource like bullets or grenades that you have a certain number of, or a weapon. If its a consumable or a resource and you health/ammo for that type are full, dont do anything. If they arent, signal back to the item that theyve been picked up and then add them to your variable that keeps track of those things. If its a weapon, check if you already own the weapon first, and if you dont have one send it the same signal. Instead of having some variable that holds a number, instead make each of your weapon types a boolean in the player script like
var hasShotgun : bool = false
and then when you pick it up in the game set it to true. then when youre going to change weapons you can just have all of the weapon types in an array, go each of the weapons in the array one by one, checking each if their bool is set to true, and if the next weapon in the array is set to true then call a function to the overlay youre using to display the weapons so it knows to change state and hide any weapons that are out and show the correct weapon. You can use this to change a state machine that controls the logic of your guns too.
Now. A “randomly generated” level system is… well it depends on how randomised you want it to be. Again, i’m not sure of your skill level as a programmer (everything ive said so far might have been really basic and simple stuff you already knew for all i know), but there isnt going to be an easy or straight forward way of going about this. Maybe the simplest approach would be to make a bunch of chunks for a level each with a door on either end, and randomly adding a different chunk to the end of the last like a big hallway or something, but then the players will realise theyre only really travelling in one direction.
something like this could work, or maybe this. A tutorial on youtube by the people who made the signal tutorial i was talking about made a video on a solution here. Ultimately, unless you can find a plugin that will make exactly what you want , this will easily be the most complicated and difficult part of what you have in mind. There’s one algorithm in particular if none of these suit, called wave function collapse and that’s whats used by most professional studios that need procedural generation for their games. This is probably the best video I’ve seen on the subject. I’ve thought about using procedural generation in my own projects before and have spent some time playing around with it, but ive never been able to get results I’ve really liked. I wish you have better luck with this than me!
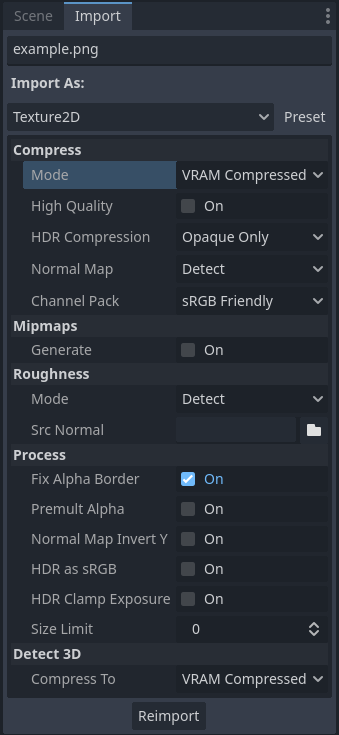
Finally, the last thing you asked about, importing your own textures, is the by far simplest. You have a file system dock in the editor, with a folder names “res://”, if you want to import a texture right click on the dock, click “open in file manager” and drag and drop whatever textures you want in. the format isnt hugely important. The official docs go over importing textures here , but be careful when you go to use them by adding them to a sprite or something. If youre making a GZDoom-style game im aassuming that means pixel art, and godot will try to automatically compress an image when you go to use it. select the image in the file system, then find your import dock and set the compression mode to lossless or vram uncompressed, and then under process make sure “fix alpha border” is set to true.
In theory with those import settings the pixel art should still look right and not be too blurry or anything, but if theyre not theres more things you can try. for example, if you use an animatedspritr3d and it doesnt look right, messing around with some of the properties it inherits from SpriteBase3D might fix it. particularly things like alpha_antialiasing_mode, alpha_cut, alpha_hash_scale, and alpha_hash_scale. Make sure texture_filter is set to EXTURE_FILTER_NEAREST_WITH_MIPMAPS. lots of stuff to mess around with an experiment.
The very first thing to do? make a floor for a character to stand on. make a characterbody3d node and stick a camera on it, make a script on it. itll come with some player controls stuff already written out for you. make walls and roofs and platforms to jump from. Make the items, then some weapons, make the weapons shoot things, make some enemies to shoot at, give them a basic ai. Do what feels fun! do what feels important. starting a big project like this can feel overwhelimg, especially at the start. nobody can tell you what the “correct” thing to do first is, or the “correct” thing to do next. The only “wrong” thing to do is nothing. You can only make a game one node or one line of code at a time.
Sorry if you didnt want or expect a response this long or in depth. I didnt anticipating writing one so. Best of luck! I hope i get to play your game when it comes out.
Disclaimer: I’m not an expert on Object Oriented Programming, but hopefully this all makes sense and can help you get on your way!