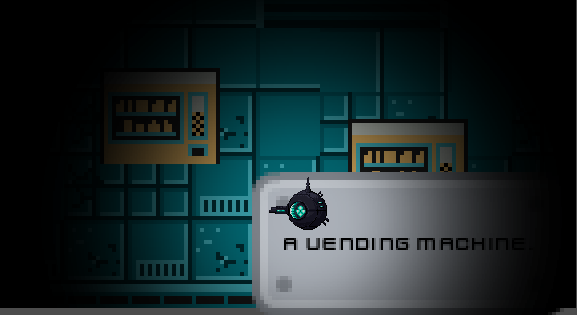
RPG textbox blocked by CanvasModulate

Godot Version

4.2

Question

Hi. I’m using a CanvasModulate to apply darkness to my level. For the textbox, it’s a NinePatchRect triggered when the player interact with it.

How do I make textbox appear on top of the CanvasModulate in order to make it stand out?

Capture

Please let me know if more details are required.

The videos that I followed

You’ll need to separate canvas layers in your scene. Add a CanvasLayer node to the scene root and reparent all of the UI Control nodes as children of this new CanvasLayer node. When UI is isolated within its own CanvasLayer like this, no light/shadow effects from other layers will affect it.

2 Likes

Hi. Thanks for the reply.

The textbox is instantiated by another scene that I put in the LevelMap. How do I reparent a node that only exists when it is instantiated in the game?

I’m a beginner who is still learning. Please forgive me if I asked silly questions! >.<

The project file for your reference.

I’ve checked your project, and here are some of my ideas on how this can be done:

  • Textbox instantiating is handled by the DialogueManager.show_text_box function. There, we can find this line of code:
    get_tree().root.add_child(_text_box)
  • This will add your TextBox node as a child of a node yielded by calling get_tree().root. Instead of this root node, we need to have our CanvasLayer node. Let’s create a new variable in dialogue_manager.gd:
    var ui : CanvasLayer
    Now we can replace the node that we call the add_child method on with the new ui variable that is supposed to hold cache of the CanvasLayer:
    ui.add_child(_text_box)
    instead of:
    get_tree().root.add_child(_text_box)
    However, this will result in an error since we’ve declared the new variable in the DialogueManager but not assigned it with anything. This raises the architectural question of how we can get the actual value with the cache of the required node.
  • As a quick solution, I suggest that your LevelMap should do this:
@onready var ui: CanvasLayer = $TextBoxLayer

func _ready():
	DialogueManager.ui = ui

This will get the cache of the CanvasLayer node that you’ve called TextBoxLayer in your scene and store it in the ui variable. By the way, I suggest changing TextBoxLayer to something like UILayer since you don’t need an individual CanvasLayer for every UI element you have, they can share the same layer.
Next in the _ready function we pass value of the LevelMap’s ui variable to the DialogueManager’s ui variable that we’ve declared before.

This will work, but the TextBox you are instantiating will be offset. I had some problems sticking to your original implementation of passing global position to the Textbox instance since your project scaling system is rather convoluted, and Godot corrupted (again) some .tscn files for me. So, I’ve made a UI system that will remain in the same place on the screen instead. I also noticed the GJ_2024 part in the name of your project, so I suppose that stands for the game jam. I don’t want to force beginners who are tight on a game jam schedule to learn the idiosyncrasies of Godot’s UI system and leave you with the system that you may not fully understand for now, but this is the only way I found to make everything look properly.

I’ve added a CenterContainer as a child of TextBoxLayer:

 ┖╴TextBoxLayer
    ┖╴CenterContainer

Anchor points of the CenterContainer are L=0.5, T=0.8, R=0.5, B=0.8. This can be configured by setting Layout / Anchors Preset property in the inspector to Custom for the CenterContainer. Anchor Points section will appear below the Anchors Preset.

Finally, the code also needs some minor adjustments:

level_map.gd

@onready var center_container: CenterContainer = $TextBoxLayer/CenterContainer

func _ready():
	DialogueManager.ui = center_container

dialogue_manager.gd

Declaration of the ui variable (changed static type):
var ui : CenterContainer

And the final form of the show_text_box function:

func show_text_box():
	_text_box = text_box_scene.instantiate()
	_text_box.finished_displaying.connect(on_text_box_finished_displaying)
	ui.add_child(_text_box)
	_can_advance_line = false
	_text_box.display_text(_dialogue_lines[_current_line_index])
1 Like

I weeped. You’re a lifesaver… Straight to the point and educative.

It now works perfectly as I intended! Does that mean every UI element I create later on can be added to this UILayer using the same method?

I now declare you as my FRIEND and our friendship shall last forever! XD

Thank you so much. <3

Also, may I ask what is center container usually for?

Yes, just store the parent node in a variable and call the add_child function on it. Most games will need only one CanvasLayer node for UI that can be shared across different UI elements.

I would also suggest creating a script and saving your main UI CanvasLayer as a separate scene at some point when your UI logic is becoming too complex. Just as all of your player logic is encapsulated into its scene with its own script, you should also have a universal UI overlay/HUD node that will encapsulate all logic related to the new UI packed scenes instantiation and freeing of nodes that are no longer in use. Then, you can connect signals or call this new main UI node from other scripts, like your DialogueManager. It’s not something that I would advise rushing to implement right away at this point, or even in your first several small games, but you’ll notice that at some point, for your game logic to scale more easily, some more complicated architecture may be needed.

It centers all child UI nodes in the rectangular area it defines. In the post above, I specified anchor points as L=0.5, T=0.8, R=0.5, and B=0.8. This is just a point that is 80% of the screen height from the top and, therefore, 20% from the bottom. Horizontally, it is 50% of the screen width. That’s not very useful as a container since both left/right and top/bottom anchors are the same. You can change them to something like L=0.25, T=0.5, R=0.75, B=1. Note that the values are fractions of the corresponding width/height of the screen, specifying the offset from the left side of the screen for the horizontal axis and offset from the top side of the screen for the vertical axis.

So now the CenterContainer has a width equal to R-L = 0.5 widths of the screen and center at (L+T)/2 = 0.5 of screen width.
The vertical axis will have B-T = 0.5 screen height centered at (B+T)/2 = 0.75 vertically.

You can see the frame in the editor corresponding to the area CenterContainer now takes. Now try adding a child to this CenterContainer. Let’s say a ColorRect node, for example. Set its Layout / Custom Minimum Size to some arbitrary value, like (40, 40) or something. You’ll see how the colored square is now centered in the area that CenterContainer is defining.

This approach will also scale perfectly for any screen size/ratio since we’ve used only relative ratios for anchors instead of relying on constant positions in px. Btw, anchors are not exclusive to the CenterContainer, they are a property of any Control node.

However, for complex UIs, I would personally avoid using anchors for everything, giving favor to specifying the layout with containers. This will require setting proper input propagation if you’ll need to click on anything under UI, but the benefits that come from containers are easily worth this extra step. Just as with the game architecture, Godot UIs are another skill that should gradually come with practice.

Good luck with your project :slight_smile:

1 Like

This topic was automatically closed 30 days after the last reply. New replies are no longer allowed.