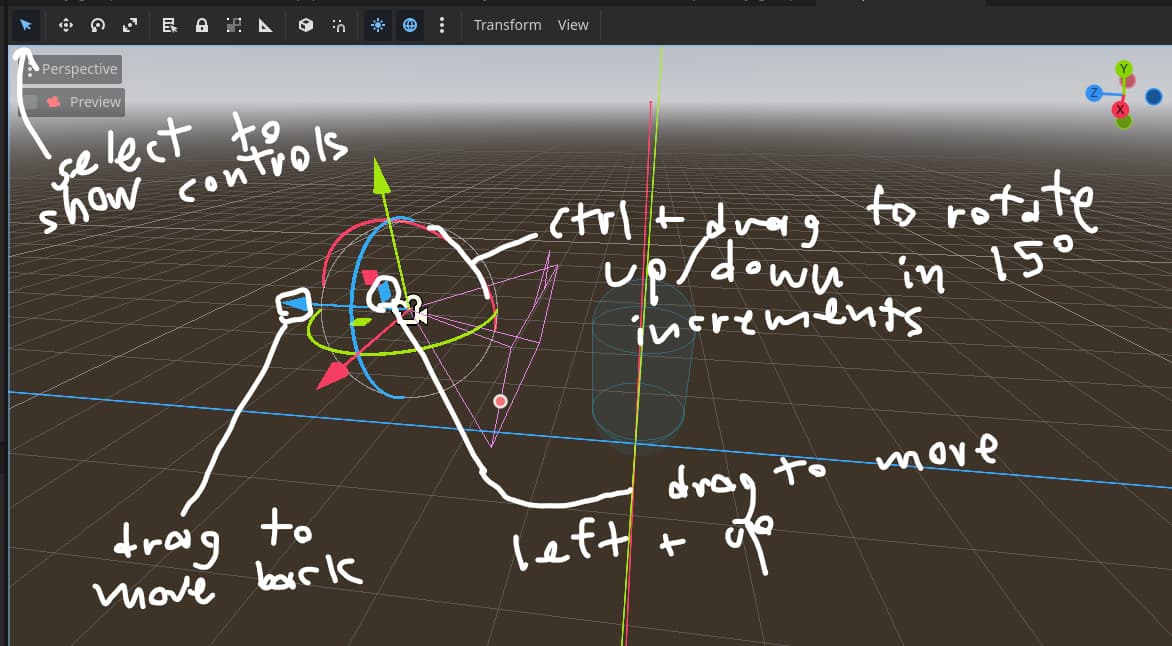
Part 3.1: Equipping items in 3d (advanced)
This part is probably, definitely overkill. With this system, you can create- let me check -infinite layers of clothing, that block other layers of clothing in- put this in your abacus -infinitely many ways. We’ll go over simplifications of different parts of this as I go, but let’s start by showing off what it empowers the final product to do.
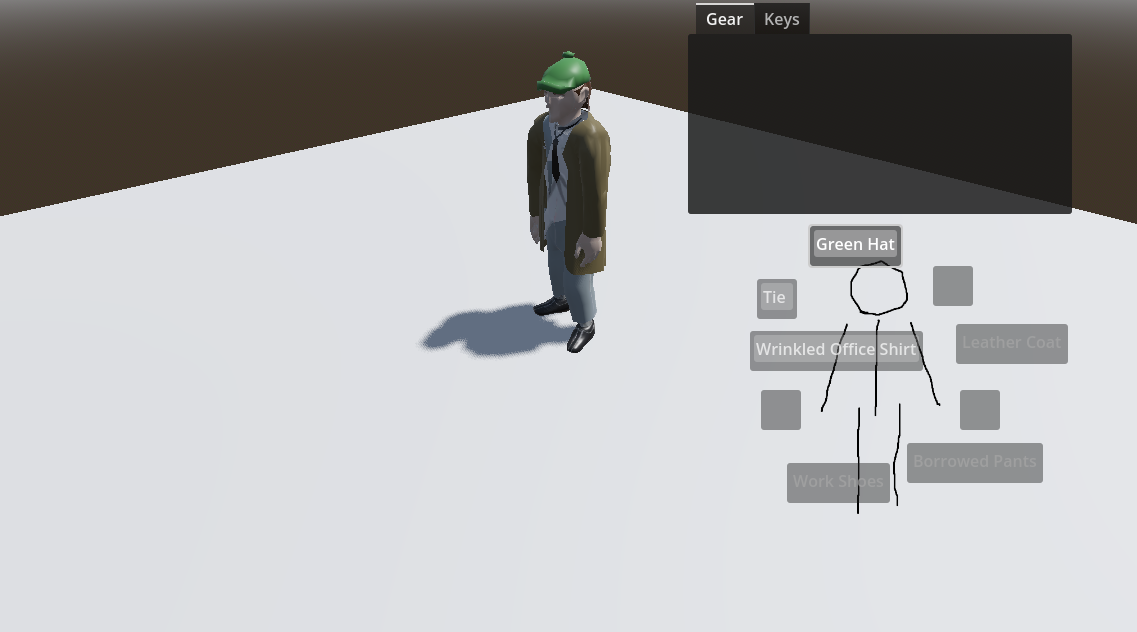
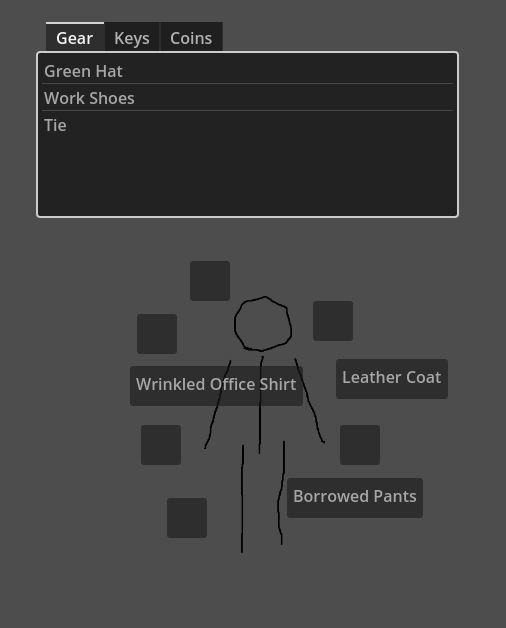
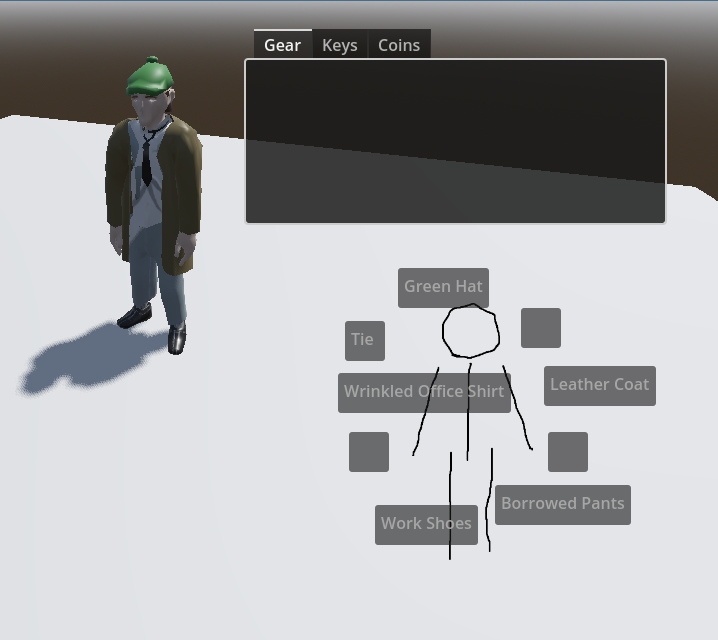
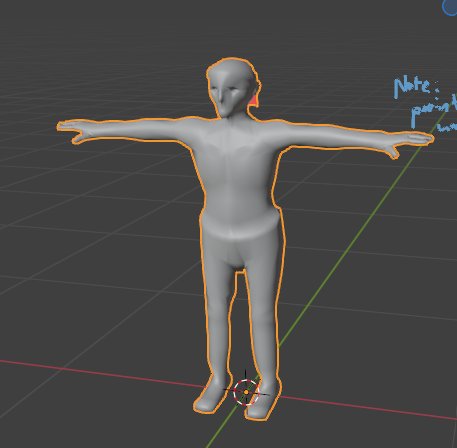
This is Geno. He ran away from his job.
I was going to make an rpg centering on him and his friends until I realized how hard it is to make rpgs. After about 200 hours of working on dialogue systems, rpg mechanics, a poorly justified multiplayer system, and this guide, I have very little to show for it (recall the habit of hitting my head against problems without taking a step back to reflect).
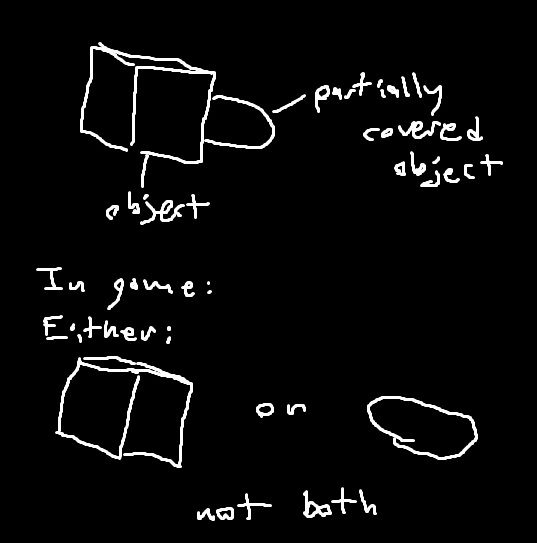
But… look at the flap on his shirt! It gets hidden when he puts pants on. Isn’t that remarkable? Basically, it shows that the shirt is broken up into at least 2 parts. The legs part, and the torso part. The legs part is occluded by the pants. Not by the gpu, not by the programmer (well, you are going to write code to establish this relation, but it won’t just be static connections), but by the artist. Whoever makes your character models, whether it’s yourself or somebody else, they can control what clothing shows or hides other clothing completely from their 3d art suite of choice.
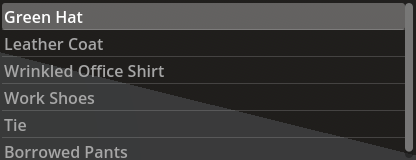
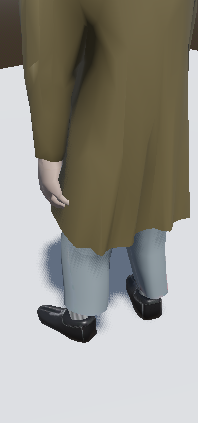
Coat on:
Coat off and shirt on:
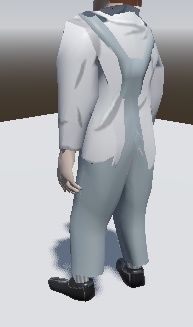
Coat and shirt sleeves forcefully enabled using the remote debugger:
Here, you can see the same effect with the coat and the shirt sleeves. The shirt sleeves are actually much baggier than the coat sleeves. But the coat hides the shirt sleeves.
What, doesn’t sound like much? Well, uh, let’s you do it pal! Seriously! Finish this guide and implement the system yourself! Here’s the plan:
First, we’re going to set up a root motion controller character in Godot. This is just so you can see our character moving and make sure clothing parts aren’t clipping into each other. This is also a remarkably esoteric task when using animations from Mixamo, which do not have a game-ready root bone by default. The addons required for this are not actively supported, and I encourage you to try to come up with custom root motion solutions, even though I failed to do that.
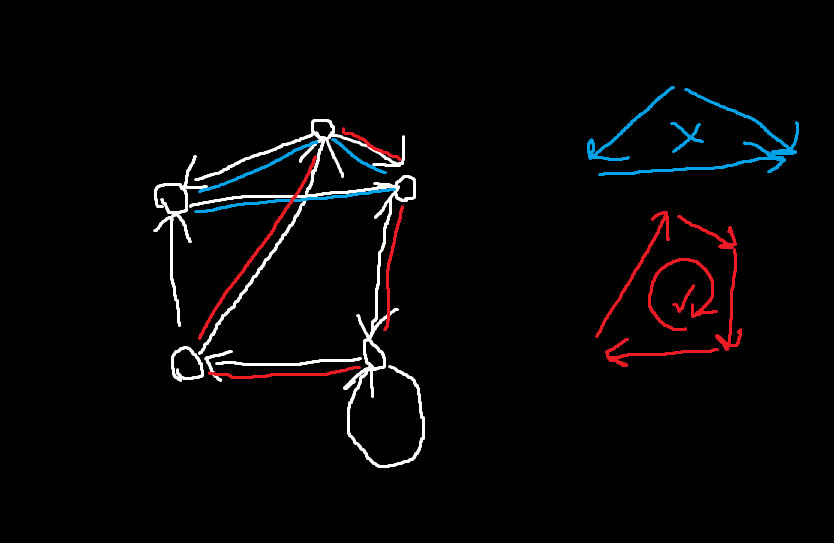
Next, you will establish relations between the clothing items based on a naming scheme you give them in Blender: Each object’s name will be a comma separated list of groups it belongs to, and if it belongs to a group starting with “-” (“-Shirt”, “-Legs” etc), showing this object will hide all the objects in that group.
If you’re not doing the next section, you at least need a .glb file in your project with a character and a skeleton in it. If you’re not sure how to do that, please read at least the “Importing into Godot” section from the Mega Optional Tangent below.
Mega Optional Tangent: “Quick” and Dirty Mixamo Setup with Root Motion
Just a heads up that animations are always super finicky. I’m really sorry if this doesn’t work for you, but I simply can’t account for all the things that may go wrong on another person’s setup. If you’re really committed to following this section, just try to be patient, and don’t be scared of coming up with your own solutions to certain parts.
Lets start our Blender project with an armature from mixamo. Make a folder in your Godot project for your character, if you haven’t already, and make a subfolder called “External”. To mark this folder as something Godot shouldn’t care about, add a blank file to it called “.gdignore”. If you save our Blender project for the character here, Godot won’t try to import it, but you can still include it in our project for version tracking, which I believe is the main motive for the .gdignore functionality in the first place.
Open Blender and create a new file in this External folder. Then, go to Mixamo and download one of their locomotion packs to the External folder. Install a Mixamo root motion addon for blender. These addons combine the motion of the hip bone from Mixamo rigs, the bounding boxes of the rigs at different points in time, and other data to build a “game ready” root motion bone.
Root motion will allow the animations to control how our character moves, fitting the theme of our clothing system of deferring power over the character to the artist. Typically, the “root motion bone” is on the ground plane and only rotate on the vertical axis. These bones describe the “root” of the character. Godot can then “consume” the motion, then you can reapply it as physical motion of a character through the game world.
The primary weakness of the mixamo root motion addons I found were that neither allowed for proper rotation on the vertical axis, likely since it’s hard to source this from the hip bone alone. This limits our character controller to strafe movement.
Once you have the addon installed, use it to import the locomotion pack you downloaded in batch. All the animations should have root motion baked into them properly. The addon should support importing all the animations as actions on one armature instead of multiple armatures. Make sure this is the case.
Optional Optional Tangent: Retargetting Mixamo animations with root motion
If you want to use the same animations on multiple characters, without ending up with multiple copies of the same animation file, import these animations into a separate Blender project using the same addon, then save that blender file to your Godot project in a place where Godot will import it. Then, to make animations from this “shared” rig work with individual characters, go to the import settings of the blend file with the shared animations, select the Skeleton3D in the import panel and create a new BoneMap with a SkeletonProfileHumanoid. If all goes well, all the points on the skeleton profile should appear green. This means they both have a valid match and are attached to the rest of the bone hierarchy. Save the BoneMap resource as a file, and apply it to whatever characters you end up importing in the same way. Finally, export all the animations from the shared blend file as files and add them to an animation library.
Now, you can load the animation library into any animation player or animation tree you use for any of the characters that have that BoneMap applied in their import settings.
Importing into Godot
Design your character. Depending on your blender experience, this can be as simple as parenting objects to the armature:
Separate Objects/Retro style: Shift+A to add a mesh. Move it into place on the armature/edit it to your liking. Then select it, shift-click the armature, Ctrl+Tab to enter Pose Mode, click to select a bone, then Ctrl+P to parent the object, and select “parent to bone”. Repeat this process for all the objects you want to create. Make sure to have some objects that partially cover other objects up, such that you want them to fully cover them in-game. This will add an easy way to check if the armor system is working later.
Or, you can sculpt your character as a single solid mesh (clothing items should still be as separate meshes), then parent it to the armature with weights:
Scupled body and clothes/Modern style: Sculpt your mesh. Click it and shift-click the armature, Ctrl+P, the click “parent with automatic weights”. Click the armature. Go into Pose Mode with Ctrl+Tab and test that the weights are good. If they aren’t, click the mesh, press Ctrl+Tab, then 7 to enter Weight Paint mode. Go through the bones and look for anomalies in their influence on the mesh and fix them with the weight brushes. You will run into partial coverage relations more often, but it helps to make a clothing item that is intended to cover another clothing item or body part that is actually larger. Since then, if the system doesn’t work, you will see obvious clipping on that part of your character.
Put the block-out character and their prototype clothing items into a collection, and the armature into another collection. You can do this by going to the Outliner panel in Blender (in the top left by default), right clicking the top collection, clicking “new collection”, and moving desired objects into it by clicking and dragging their names in the Outliner.
Once everything is ready, go to File → Export → Export as glb/gltf. In the popup, check “Visible Objects”. You probably also want to open the export properties Data → Meshes and check “Apply Modifiers”.
you may make changes to the character later, but the armature object should stay the same. By splitting them into different collections, you can disable our original character’s collection in favor of a new one, by hiding the original collection and showing another, while keeping the armature. Including visible objects will make sure only the objects on screen find their way into the export, which I find pretty intuitive by Blender standards.
One more thing. In my experience working with animations, I really think animations in Godot should loop by default. But they don’t! Animation actions from Blender will only loop if you rename them to end in “-loop”. Luckily, this is easy to do. Press Ctrl+F2 to bring up the batch rename menu. Set the object type to Actions, set the selection to All, set the rename type to Set Name and click “Suffix”, then set the rename to “-loop”, this will add the -loop suffix to all actions. You can then re-export the .glb to get looping animations.
Quick character controller
Now that you have a .glb in Godot. It should import as a scene. Double click it to view the export settings. You should see all the animations without the -loop suffix in their name. And if you click on them, you should see their loop type is set to “Linear.”
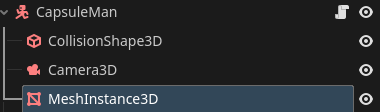
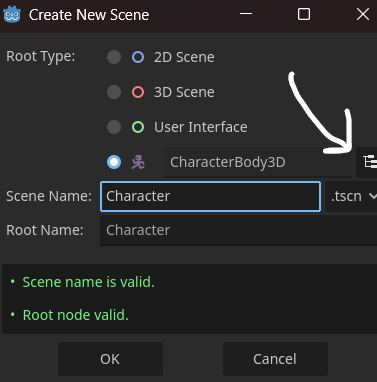
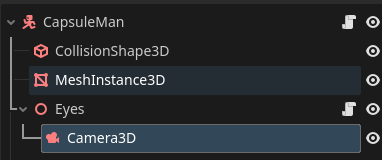
Create a new scene in your character folder to contain the .glb and other behaviors you create. Make the scene root a CharacterBody3D and add the .glb as a child.
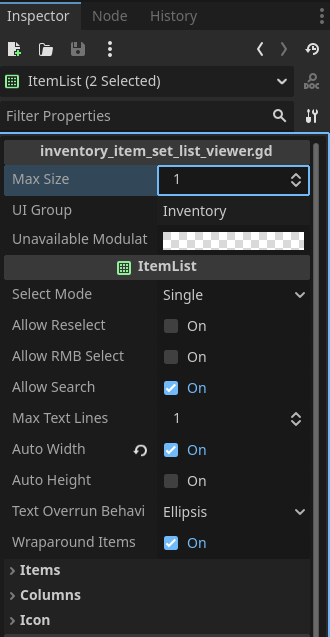
Give the CharacterBody3D a CollisionShape and a copy of the inventory ui. Then create a 3d scene with a source of light and some ground collision (if confused, refer to the introductory section called “Level Scene”), set it as your main scene and add the character to it. Also, add a camera. For this demo, a static camera is more than enough.
Now, here’s the plan:
Set up an AnimationTree to take input from the player and control animations accordingly.
Then, read root motion back from the AnimationTree into this script to apply motion to the player.
AnimationTree
First, check that the root motion is working. Right click the imported Blender character and check “Editable Children”. This should reveal an AnimationPlayer. Select any animation that moves the character and see that the character moves through the world. (make sure to have the 3d editor open to see the character move).
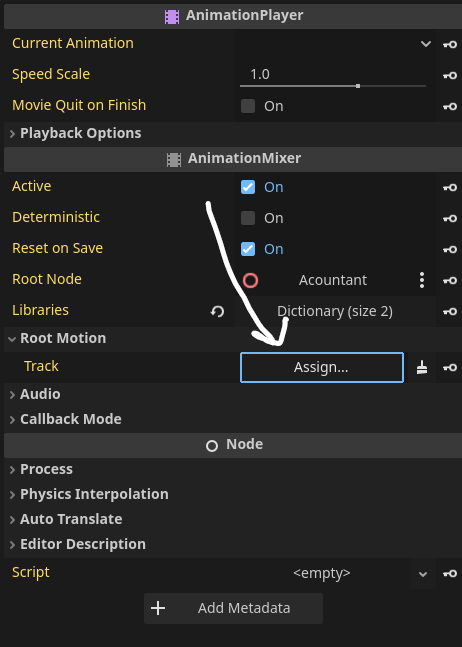
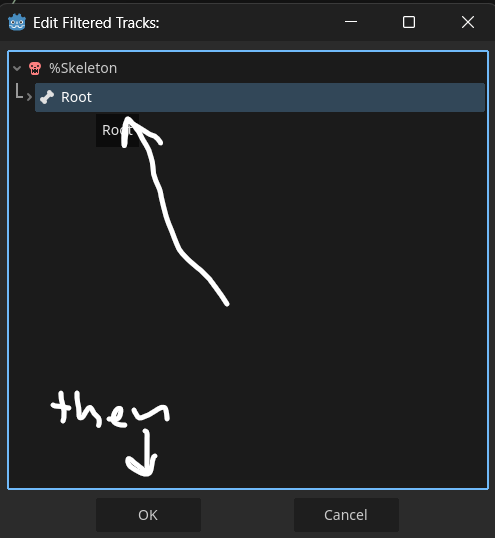
However, if you set the Root Motion Track property of the AnimationPlayer in the inspector:
Then set the track to the “Root” bone of the armature:
The character should now play animations without moving. Note that, when the walking or running animations loop, the character no longer teleports. The loop should appear seamless.
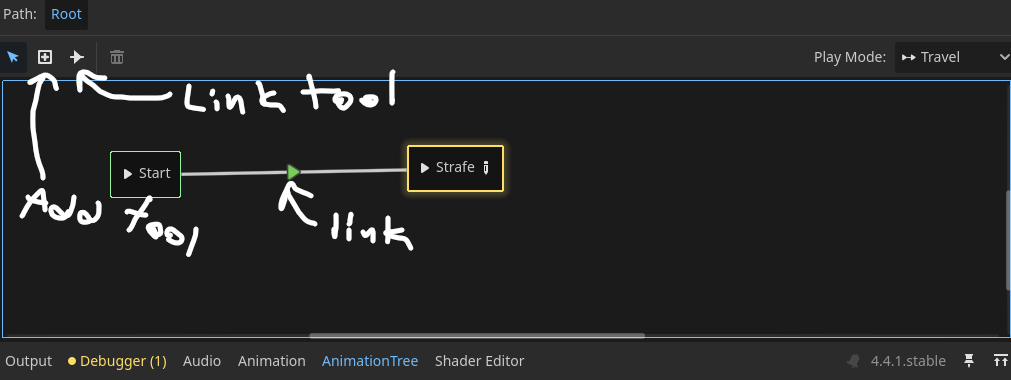
If this is the case, add an AnimationTree to your character scene. Set the “Anim Player” field to the AnimationPlayer. Then set the Root Motion Track the same way. Finally, set the Tree Root property to a new AnimationNodeStateMachine. An “AnimationTree” tab should open in the bottom dock. You can open it manually by double-clicking the AnimationNodeStateMachine resource.
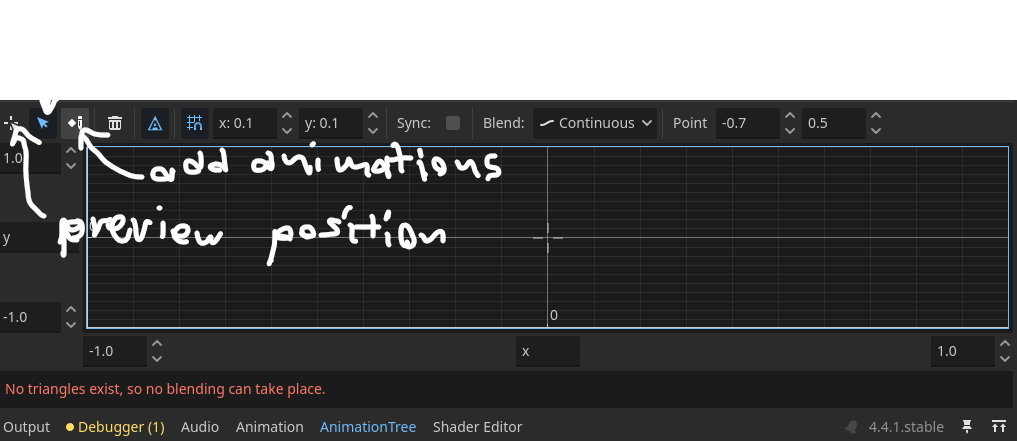
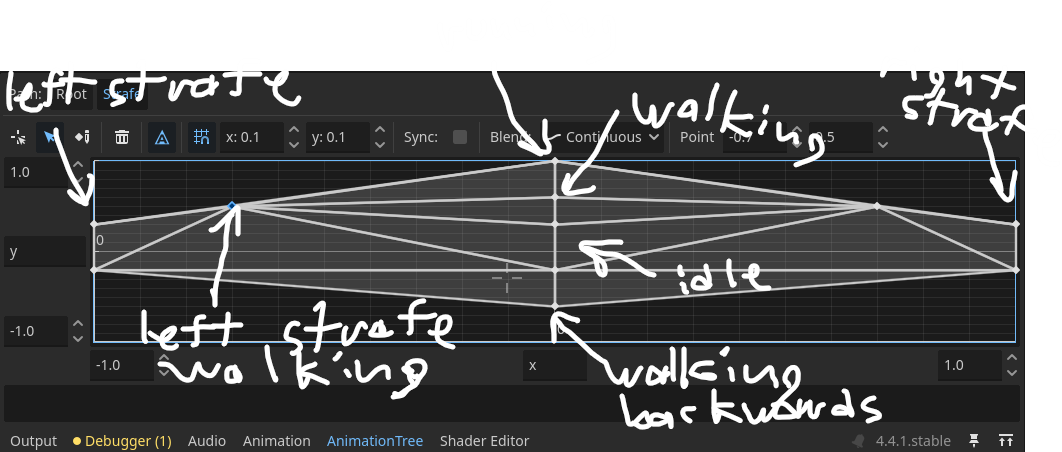
In the AnimationNodeStateMachine, add a node of type BlendSpace2D using the add tool. Use the link tool to connect the BlendSpace2D to the Start node.
To the BlendSpace2D, Add a walking, running, and strafing animations from the locomotion pack by selecting the add animations tool, then clicking in the blend space. For walking backwards, add a walking node, but set it to play backwards by clicking on it with the select/edit tool, which open’s its properties in the inspector.
The blend space is basically an input for the player. I laid mine out so that “up” (1.0 on the y axis) is forward, “left” (-1.0 on the x axis) is left, right is right, and down is back. Some more dogmatic Godot users may point out that -1 on the y axis is typically forward in other parts of the engine. So it’s totally sensible to flip this shape around.
Make sure to use the preview different positions in the AnimationTree by clicking the preview position button, then clicking in the blend space and seeing how the character moves in the 3d editor. Make sure the looping is seamless and the character moves in place, as this indicates the root motion is being consumed properly.
Controlling animations
Now, we’re ready to send inputs to the animation tree. Add a new Node to the character scene and name it Controller. Controller will record input from the player, and emit a Signal when the input changes. You can hook up this signal to the AnimationTree in a way that changes the position in the blend space you created.
Bit of a mouthful, I know. Here’s the script to attach to our controller:
extends Node

@export var target_property := ""

signal direction_changed(property:StringName, to:Vector2)

var interpolated_input := Vector2.ZERO
const INTERPOLATION_SPEED := 5.0
#emit local_target_direction_changed with the current input direction
func _process(delta:float):
	interpolated_input = interpolated_input.move_toward(
		Input.get_vector("m_left","m_right","m_down","m_up"),
		delta * INTERPOLATION_SPEED
	)

	direction_changed.emit(target_property, interpolated_input)
Replace “m_left”, “m_right” etc. with whatever your preferred WASD actions are, or replace them with “ui_left”, “ui_right” etc if you have no idea what I just said to you.
As you can see, the script is actually pretty short. You have a target property to set wherever you send the input, and you compute the input each frame. The INTERPOLATION_SPEED constant and it’s logic gives us something like Unity’s “GetAxis” method (where Godot’s Input is more like Unity’s “GetAxisRaw”), where the player input is smoothed over, mostly to smooth out the experience for keyboard users.
I recently played a Metroidvania Month entry with a 3d character that, on WASD, very clearly did not use this smoothing. That gave the animation a fun, snappy vibe in it’s own right, so you could simplify this script even further: just passing the raw input to the signal, maybe even on an _input callback instead of a _process callback, if you’re ok with that.
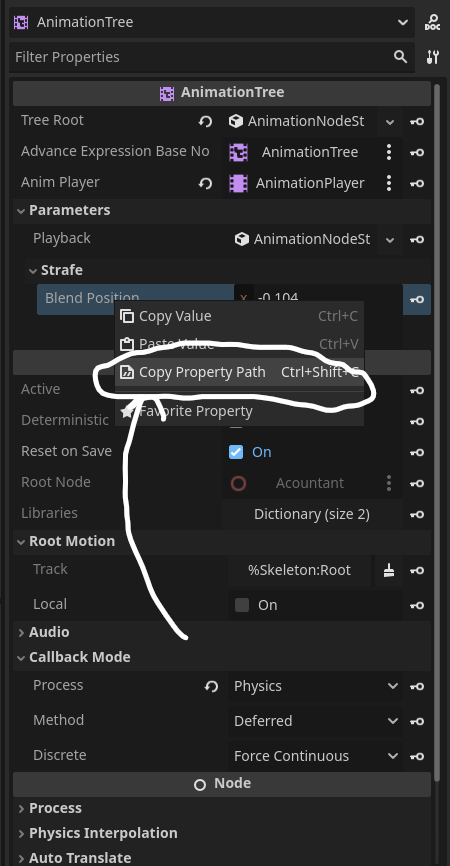
Once this script is attached to the Controller in the editor, connect the direction_changed signal to the set method on the AnimationTree. Then, with the AnimationTree selected, look in the inspector panel. You should see a drop down box called “Parameters”. This contains all the parameters of the AnimationNodeStateMachine you created. Open it and you should see another drop down with the same name as the blend space you created earlier. Mine is called “Strafe”. Open this drop down and you should see a property storing a 2d position. This is the position of the blend space that determines the animation. Copy the path to this property:
Then, select the Controller again. The script exports a field called target_property. Select it’s value in the inspector and Ctrl+V to paste the path you copied from the AnimationTree.
To review, the direction_changed signal will call the set method on the animation tree with the arguments target_property and interpolated_input, this will set the position of your blend space to whatever interpolated_input is. This will then trigger the animations of the character to change according to how you set up the blend space.
Launch the main scene to test this. Use WASD to move if you set up the actions, or arrow keys if you used the ui_ actions. The character’s animation should change as you move around, but it may not match how the character is actually moving in the world. Maybe they’re not moving at all. Time to fix that.
Applying Root Motion
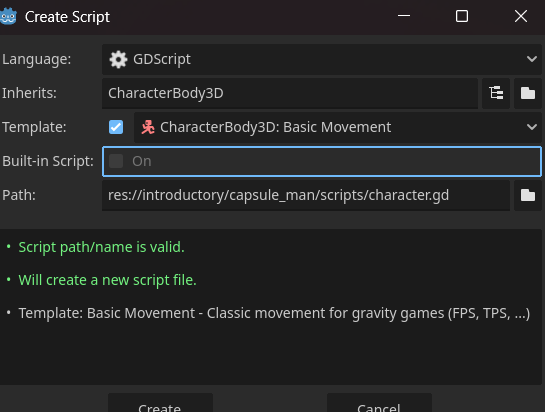
Add a script to the CharacterBody3D using the default CharacterBody3D template provided by Godot. This will appear if you try to create a script on a CharacterBody3D in the scene tree, or create a script inheriting from CharacterBody3D in the filesystem. The template should look like this:
extends CharacterBody3D

const SPEED = 5.0
const JUMP_VELOCITY = 4.5

func _physics_process(delta: float) -> void:
	# Add the gravity.
	if not is_on_floor():
		velocity += get_gravity() * delta

	# Handle jump.
	if Input.is_action_just_pressed("ui_accept") and is_on_floor():
		velocity.y = JUMP_VELOCITY

	# Get the input direction and handle the movement/deceleration.
	# As good practice, you should replace UI actions with custom gameplay actions.
	var input_dir := Input.get_vector("ui_left", "ui_right", "ui_up", "ui_down")
	var direction := (transform.basis * Vector3(input_dir.x, 0, input_dir.y)).normalized()
	if direction:
		velocity.x = direction.x * SPEED
		velocity.z = direction.z * SPEED
	else:
		velocity.x = move_toward(velocity.x, 0, SPEED)
		velocity.z = move_toward(velocity.z, 0, SPEED)

	move_and_slide()
We’re going to gut this thing like a fish! Check this out:
## CharacterBody3D controlled exclusively by the root motion track of an
## AnimationMixer, which is generally expected to use physics processing to sync
## properly with this script.

extends CharacterBody3D

@export_node_path("AnimationMixer") var mixer_path := NodePath("")
@onready var mixer:AnimationMixer = get_node(mixer_path)

#velocity due to acceleration stored separately so it can be computed into the
#	actual velocity alongside root motion.
var sub_velocity := Vector3.ZERO
func _physics_process(delta: float) -> void:

	if is_on_floor():
		#flatten acceleration velocity to the ground
		sub_velocity -= sub_velocity.project(get_gravity())
	else:
		sub_velocity += get_gravity() * delta

	velocity = get_root_motion_velocity(delta) + sub_velocity
	move_and_slide()

	quaternion *= mixer.get_root_motion_rotation()

func get_root_motion_velocity(delta:float) -> Vector3:
		return mixer.get_root_motion_position() / delta
You may still see the bones of our original movement template. If not.. again I said we’d gut it like a fish. Who leaves the bones in a fish?
Script Explanation
mixer_path : a path to another Node relative to the CharacterBody3D in the scene tree. You can set it from the editor by clicking on the property in the inspector. Then, a view of the scene tree will appear with valid nodes highlighted.
mixer : An AnimationMixer. AnimationMixer is the base class for AnimationTree and AnimationPlayer. So you can use this script with either if you want. The mixer will tell us exactly how much root motion has been consumed.
sub_velocity : velocity due to external forces is separate from velocity due to root motion. We have the velocity due to root motion in the mixer, but need to store this velocity separately.
_physics_process : moves and rotates the character based on root motion. This is done in physics process so the motions are all caught by the physics engine. Works best if the “Callback” field of the AnimationTree is set to “Physics”.
_get_root_motion_velocity(delta:float) : A small wrapper so I don’t have to write this awkward “divide by delta” line more than once. The mixer doesn’t actually store velocity, it stores a change in position. And since velocity is position over time, we need to divide by delta to get the velocity.
The final value given to velocity on each physics step is always _get_root_motion_velocity(delta) + sub_velocity, creating a character that moves on root motion and is effected by external forces. In this case, the only external force implemented is gravity.
Testing
Attach the script, set the mixer_path to the AnimationTree, and run the main scene. The character should move according to how the root bone moved in Blender.
Holes (sculpted, solid characters only)
This section only applies if you sculpted a character as a single mesh. You can skip it if you haven’t, or if you find a way on your own to break your character into parts without compromising their design. The latter is a great step to take if you’re going for retro graphics, since older hardware often didn’t have support for meshes that actually bend with on a skeleton, and broke up their characters into solid objects to make up for it.
That being said, how many holes does a human have?
Here’s Geno’s original model in Blender:
He has zero holes. No, not even there. He’s not quite manifold, if you know what I mean, but he’s totally waterproof. There’s no holes in the base mesh. This is sub-optimal for gaming.
After all, I don’t want to hide the entire man if he just puts on a shirt. I only want to hide the torso and arms. To do that, we’re going to need to get out our buzzsaw and make some cuts.
Gah! Now he looks like a robot! This is terrible! (I’ve actually already fixed this, but I’m displaying the model in solid view, which always draws edges between objects regardless of if seams would actually appear there in-game.)
Take your character’s mesh, make a copy of them and add it to a new collection. Do this for clothing items as well. DO NOT BREAK UP THE MESH YET.
The Data Transfer Modifier
This section is brought to you by a 2022 forum post on Blender stackexchange that works way better than it has any right to.
For each of the copies, open the modifier stack in the Properties panel (typically in the lower right of the screen, there’s a vertical list of icons, the modifier stack is the one that looks like a wrench). Add a modifier called “Data Transfer” and give it these settings:
Of course, replace “Body.Main.002” with whatever the original copy of the mesh was. Also, click “Generate Data Layers”. Make this modifier come before the Armature modifier in the stack by clicking and dragging the 8 dots in the top left of the modifier or clicking the drop down and clicking “Move to Top”
Now, go to the original mesh. In the same panel, it should have an “Armature” modifier. Remove or disable this modifier.
That’s more like it. If you are still seeing seams in your character, it might be because you are viewing the scene in “solid” mode, which displays edges of objects no matter what. Change the viewport to Material Preview or Render by pressing Z and selecting an option from the radial menu to see the smoothed out character.
What you just did was target the copied mesh’s normals, the data that will determine how it is lit, and it’s vertex weights, the data that will determine how it bends with the mesh, to copy directly from the original. Now, when you split this object up, its modifiers will also be duplicated.
Normally, when you split and object in two, any chance at smooth normals along the seams are destroyed, and you may end up recalculating the weights of the separate meshes, which might cause holes to appear between them when the character’s rig bends. Now, however, any meshes cut from the copies will have exactly the normals and weights of the original, in the exact same spots, as long as you don’t modify the cut parts too much. If you’re not sure about your character’s base mesh, it might be good to put off setting all of this up, since changing the base mesh in a way that propagates down is really hard. In exchange, the split objects will retain any smooth lighting and articulation from the base mesh.
If you want the same thing to happen for clothing items, repeat the process for clothing items. If the lighting on a copy or split object suddenly looks weird, make sure to remove the armature modifier from the original.
Once ready, export over the old glb with the new collection of split objects, and the collection containing the rig enabled, instead of the rig and the original meshes.
Occlusion
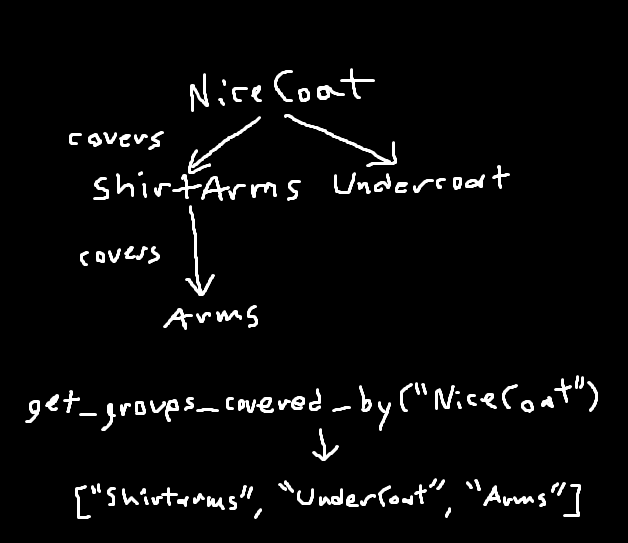
To hide and reveal these clothing items, it makes sense to use Godot’s groups, since the items may be broken into multiple parts.
Naming scheme
Now that you have your character’s body parts and clothing parts as separate objects in Blender, we need a way for the artist to tell Godot that some parts cover other parts. The naming scheme I came up with was:
Each object’s name is a comma-separated list of groups it should be in. For example, the torso of Geno’s shirt is called:
OfficeShirt,Shirt,-Torso
OfficeShirt is the filename of the item corresponding to this object in game. Shirt is a group that I added in to be occluded by higher layers of clothing, though nothing actually covers it currently. -Torso indicates that, if this node is shown, it should cover the Torso group.
Objects can occlude multiple layers:
WornPants,Pants,-Legs,-Pelvis
And they can also belong to multiple groups that are occluded by other objects, but I don’t have any examples of that in my project.
Rename all the parts of your character’s body and clothing items to fit this naming scheme, then re-export the Blender project.
Sometimes re-importing the .glb can erroneously clear import setting in Godot like the BoneMap (which is why we saved it to a file, so it’s easy to add back in). It’s also a common mistake to not show and hide the correct collections while exporting, or to not save the export preset in Blender. Here is a checklist:
- Did I select the right collections on exporting?
- Did I use the right export preset?
- Did Godot import the file with the right settings?
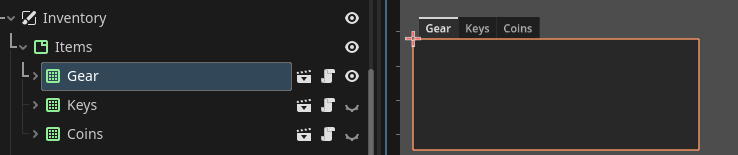
Adding objects to groups
You could do this with a tool script: Attach a script to the skeleton that iterates through its children and adds them to the correct groups (with the persistent argument set to true). But that would give you another thing to do every time you update the import with new objects. Honestly, it’s probably fine, but it’s not the solution I went for.
After all, adding a node to a group in the editor is basically just an instruction for Godot to add the node to a group at runtime. So it’s not much less performant* to have a script parse them at runtime, instead.
*yes, I’m aware that gdscript is slower than C++. But, within a reasonable number of parts, and by reasonable I mean anything less than, like, 3000, it’s going to be a negligible difference on modern hardware. If this bothers you enough, you can just use the tool script anyways.
There’s also an issue of, if there are multiple characters on screen, how to make the groups their body parts are added to “local” to their instance. There are a couple of ways to do this, but I chose to implement a custom “NodeGroupSet” resource, that replicates the properties of the SceneTree’s groups, but in resource form, allowing it to be shared around only with the nodes who need to use it.
Godot, at least until I figure out the source code, does not support scene-local groups or something similar. I may look like it does, it may feel like it should, but that simply isn’t the case. I personally think this is a great candidate for a GDExtension plugin. Since it’s a feature that doesn’t quite fit into the design of the engine, but would be useful for a lot of people.
The custom solution involves two scripts. Make a new folder in the project’s scripts folder called “custom_local_groups” for the following:
node_group.gd:
## Local, nonserializable shared node group.

## Not being serializable is a tradeoff for working with Node references
## directly.

extends Resource
class_name NodeGroup

var nodes:Array[Node] = []

func add_node(n:Node):
	nodes.push_back(n)
	n.tree_exiting.connect(
		remove_node.bind(n)
	)

func remove_node(n:Node):
	for i in nodes.size():
		if nodes[i] == n:
			nodes.remove_at(i)
node_group_set.gd:
## Approximate the experience of if Godot had local groups.

extends Resource
class_name NodeGroupSet

#map between groups and nodes
@export var groups:Dictionary[StringName,NodeGroup]

#map between nodes and groups
var total:Dictionary[Node,Array]

func add_node_to_group(n:Node, g:StringName) -> bool:
	var group = groups.get(g)
	var found = true
	if !(group is NodeGroup):
		var new_group := NodeGroup.new()
		print("created group ", new_group)
		groups[g] = new_group
		group = new_group
		found = false

	group.add_node(n)

	if total.has(n):
		total[n].append(g)
	else:
		total[n] = [g]
	return found

func get_nodes_in_group(g:StringName) -> Array[Node]:
	if !groups.has(g): return []
	return groups[g].nodes

func get_groups() -> Array[StringName]:
	return groups.keys()

func get_nodes():
	return total.keys()

func get_groups_of(n:Node):
	return total[n]

signal set_group_visible(g:StringName, v:bool)
func signal_set_group_visible(g:StringName, v:bool) -> void:
	set_group_visible.emit(g,v)
NodeGroupSet is now a resource we can attach to any script that wants to access a set of groups being used locally. Great.
Note the signal_set_group_visible method. This will let us send a signal through the resource, from one user (the inventory) to another (the script that will actually show and hide our nodes) that one group should be hidden or revealed.
We also cache the groups that each node is a member of here, replicating the behavior of Node’s get_groups method. This is crucial for determining which groups affect which other groups.
Ok! Let’s write that script and close out the tutorial once and for all.