Godot Version
4.5.1
Question
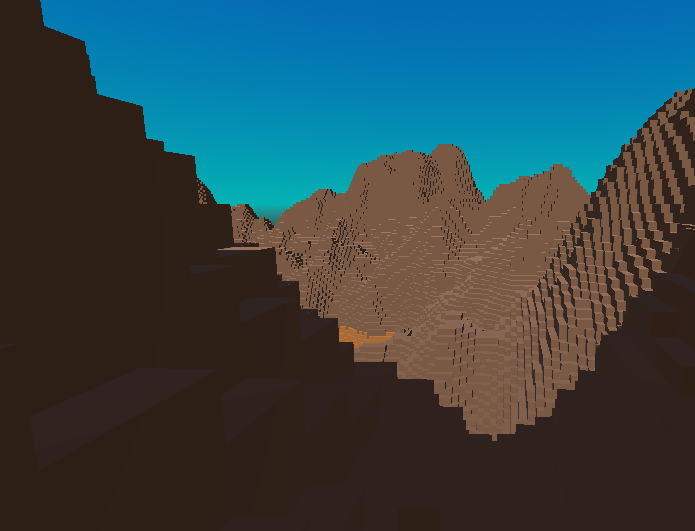
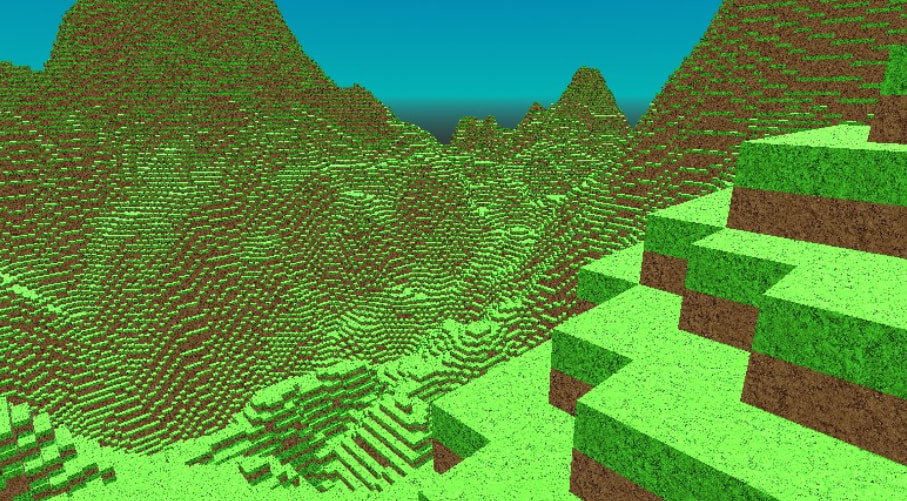
I want to make an infinite terrain that it never ends. This is the actual code which needs correction:
extends Node3D

# --- AJUSTES ---
const AREA = 500 # 150x150 = 22,500 columnas (Equivale a millones de bloques de tu script anterior)
var velocidad = 5.0
var sensibilidad = 0.001
var camara : Camera3D

var yaw = 0.0
var pitch = 0.0

var amplitud = 200.0   # Ajusta esto para la altura máxima
var frecuencia = 0.005 # Menor valor = terreno más estirado horizontalmente
var noise = FastNoiseLite.new()

func _ready():
	# 1. ESTO EVITA QUE EL NARANJA SEA MARRÓN:
	# Forzamos al motor a usar el espacio de color sRGB (Colores vivos)
	# y no el Lineal (Colores realistas/apagados).
	ProjectSettings.set_setting("rendering/textures/canvas_textures/default_texture_filter", 0)

	# 2. EL TRUCO "FULL BRIGHT" EN EL READY:
	# Esto hace que la luz ambiental no tenga dirección y no cree sombras sucias.
	var scenario = get_world_3d().scenario
	RenderingServer.scenario_set_fallback_environment(scenario, get_viewport().world_3d.fallback_environment)

	# 3. LO QUE BUSCAS DE LOS COLORES:
	# Si usas colores hexadecimales o Color.ORANGE, Godot los oscurece.
	# Esta línea le dice al renderizador que no aplique corrección gamma.
	OS.set_environment("GODOT_SRGB_COLORSPACE_CHECK", "0")

	# Cámara y captura
	camara = Camera3D.new()
	add_child(camara)
	camara.make_current()
	Input.mouse_mode = Input.MOUSE_MODE_CAPTURED
	# 1. Seguridad: Esperar un frame para que el motor inicialice
	await get_tree().process_frame

	setup_lighting_and_env()
	generar_mundo_seguro()

	# Cámara
	camara = Camera3D.new()
	add_child(camara)
	camara.make_current()
	camara.position = Vector3(AREA/2, 100, AREA/2)
	Input.mouse_mode = Input.MOUSE_MODE_CAPTURED

func _unhandled_input(event):
	# Captura/Liberación de mouse
	if event is InputEventKey and event.pressed and event.keycode == KEY_ESCAPE:
		if Input.mouse_mode == Input.MOUSE_MODE_CAPTURED:
			Input.mouse_mode = Input.MOUSE_MODE_VISIBLE
		else:
			Input.mouse_mode = Input.MOUSE_MODE_CAPTURED
	if event is InputEventMouseMotion and Input.mouse_mode == Input.MOUSE_MODE_CAPTURED:
		# Actualizamos los ángulos basados en el movimiento del ratón
		# Invertimos el signo aquí para cambiar la dirección de rotación
		yaw -= event.relative.x * sensibilidad
		pitch -= event.relative.y * sensibilidad

		# Limitamos el ángulo vertical para no dar la vuelta
		pitch = clamp(pitch, deg_to_rad(-89), deg_to_rad(89))

func _process(delta):
	if not camara: return
	# Así es como debe ir dentro del _process:
	camara.position.y = int(2+(noise.get_noise_2d(camara.position.x, camara.position.z) + 1.0) * 0.5 * amplitud)

	# 1. DIRECCIÓN DE LA MIRADA (Seno y Coseno)
	var direccion_mirada = Vector3(
		sin(yaw) * cos(pitch),
		sin(pitch),
		cos(yaw) * cos(pitch)
	)

	# 2. APLICAR LOOK_AT
	# Importante: Miramos hacia adelante (sumando la dirección a la posición actual)
	camara.look_at(camara.global_position + direccion_mirada, Vector3.UP)

	# 3. MOVIMIENTO
	var movimiento = Vector3.ZERO

	# Calculamos 'adelante' basado solo en el giro horizontal (yaw)
	# Nota: En Godot -Z es hacia adelante, por eso usamos los signos así:
	var adelante = Vector3(sin(yaw), 0, cos(yaw))
	var derecha = Vector3(sin(yaw + PI/2), 0, cos(yaw + PI/2))


	if Input.is_key_pressed(KEY_W): movimiento += adelante # Ir hacia adelante
	if Input.is_key_pressed(KEY_S): movimiento -= adelante # Ir hacia atrás
	if Input.is_key_pressed(KEY_A): movimiento += derecha  # Ir izquierda
	if Input.is_key_pressed(KEY_D): movimiento -= derecha  # Ir derecha
	# 4. APLICAR MOVIMIENTO AL NODO PRINCIPAL
	if movimiento != Vector3.ZERO:
		camara.position += movimiento.normalized() * velocidad * delta

# --- GENERACIÓN ROBUSTA ---
func generar_mundo_seguro():
	noise.seed = randi()
	noise.frequency = 0.01

	var mm_instance = MultiMeshInstance3D.new()
	var mm = MultiMesh.new()

	# Configuración obligatoria antes de asignar el count
	mm.transform_format = MultiMesh.TRANSFORM_3D
	mm.use_colors = true
	mm.mesh = BoxMesh.new()

	# Importante: El count debe ser exacto
	mm.instance_count = AREA * AREA

	# Material con protección por si no tienes la textura "dirt.jpg"
	var mat = StandardMaterial3D.new()
	if FileAccess.file_exists("res://dirt.jpg"):
		mat.albedo_texture = load("res://dirt.jpg")
	else:
		# Color base si falla la textura para evitar el crash de carga
		mat.albedo_color = Color(0.4, 0.3, 0.2)

	mat.vertex_color_use_as_albedo = true
	mat.uv1_triplanar = true
	mat.uv1_world_triplanar = true
	mat.texture_filter = BaseMaterial3D.TEXTURE_FILTER_NEAREST
	mm.mesh.material = mat

	mm_instance.multimesh = mm
	add_child(mm_instance)

	var i = 0
	for x in range(AREA):
		for z in range(AREA):
			noise.frequency = frecuencia
			# Esta es la función optimizada:
			var h = int((noise.get_noise_2d(x, z) + 1.0) * 0.5 * amplitud)

			# Creamos la transformación: Escala en Y = Altura, Posición Y = Altura/2
			var t = Transform3D()
			t = t.scaled(Vector3(1, h, 1))
			t.origin = Vector3(float(x), h / 2.0, float(z))

			mm.set_instance_transform(i, t)
			mm.set_instance_color(i, _get_color(h))
			i += 1

func _get_color(y):
	if y > 75: return Color(0.4, 0.3, 0.2) # Piedra
	return Color(0.9, 0.5, 0.0) # Arena.

# --- ILUMINACIÓN ---
func setup_lighting_and_env():
	# 1. LUZ (Sol)
	var sol = DirectionalLight3D.new()
	sol.shadow_enabled = true
	sol.rotation_degrees = Vector3(-45, 0, -45)
	add_child(sol)

	# 2. MATERIAL DEL CIELO (Procedural)
	var sky_material = ProceduralSkyMaterial.new()
	# Colores exactos para el degradado horizontal
	sky_material.sky_top_color = Color(0.0, 0.498, 1.0, 1.0)
	sky_material.sky_horizon_color = Color(0.0, 1.0, 1.0, 1.0)
	sky_material.ground_bottom_color = Color(0.2, 0.17, 0.15)
	sky_material.ground_horizon_color = Color(0.65, 0.72, 0.81) # Igual al horizonte del cielo

	# Creamos el temporizador
	var timer_sol = Timer.new()
	add_child(timer_sol)
	timer_sol.wait_time = 0.1  # Se ejecuta cada 0.1 segundos
	timer_sol.autostart = true
	# Conectamos el timer a la rotación
	timer_sol.timeout.connect(func():
		if sol:
			sol.light_color = Color(2.0, 2.0, 2.0)
			# Rotamos 0.5 grados en cada intervalo
			sol.rotate_x(deg_to_rad(0.01))
			sol.rotate_z(deg_to_rad(0.01))
			# ESTO TE DIRÁ EN LA CONSOLA SI ESTÁ ROTANDO O NO
			print("SOL ROTANDO: ", sol.rotation_degrees.x)
			# 2. Calcular "Factor de Luz" (0.0 es noche total, 1.0 es mediodía)
			# Usamos el seno de la rotación para saber qué tan arriba está el sol
			var angulo_rad = sol.rotation.x
			var factor_luz = clamp(-sin(angulo_rad), 0.0, 1.0)

			# 3. Aplicar oscuridad a los colores originales
			# Multiplicamos el color por el factor_luz para que se apague en la noche
			var color_top_base = Color(0.0, 0.498, 1.0)
			var color_hor_base = Color(0.0, 1.0, 1.0)

			sky_material.sky_top_color = color_top_base * factor_luz
			sky_material.sky_horizon_color = color_hor_base * factor_luz

			# Opcional: El suelo también debe oscurecerse
			sky_material.ground_horizon_color = sky_material.sky_horizon_color

			# 4. Ajustar la energía de la luz para que no haya sombras de noche
			sol.light_energy = factor_luz
	)

	timer_sol.start()

	# 3. CONFIGURACIÓN DEL ENTORNO
	var sky_res = Sky.new()
	sky_res.sky_material = sky_material

	var env_res = Environment.new()
	env_res.background_mode = Environment.BG_SKY
	env_res.sky = sky_res

	# Iluminación indirecta para que las sombras no sean negras
	env_res.ambient_light_source = Environment.AMBIENT_SOURCE_SKY
	env_res.ambient_light_sky_contribution = 0.5
	env_res.ambient_light_color = Color(1.0, 1.0, 1.0)

	var env_node = WorldEnvironment.new()
	env_node.environment = env_res
	add_child(env_node)
So… its possible? Thanks anyway!