How to properly drag and click move, the camera?

Godot Version

4.3

Question

Hi guys. I have a tilemap and a camera 2d i can move around witht click and drag and also zoom.
When i zoom and then drag around a bit sometimes the tilemap is not visible anymore. When I move camera back it suddenly is visible again. Am I doing this wrong? Or why do I have this problem?

This is the camera code:

extends Camera2D

var mouse_down: bool = false
var last_mouse_pos: Vector2

func _process(delta: float) -> void:
    
    if Input.is_action_just_released("mouse_wheel_up"):
        var zoom_amount = Vector2.ONE / 10
        zoom = (zoom + zoom_amount).min(Vector2.ONE * 3)

    if Input.is_action_just_released("mouse_wheel_down"):
        var zoom_amount = Vector2.ONE / 10
        zoom = (zoom - zoom_amount).max(Vector2.ONE * .3)

    if Input.is_action_just_pressed("mouse_middle"):
        mouse_down = true
        last_mouse_pos = get_global_mouse_position()
    if Input.is_action_just_released("mouse_middle"):
        mouse_down = false
    if mouse_down:
        camera_movement(delta)
func camera_movement(delta: float):
    var offs = last_mouse_pos - get_global_mouse_position()
    offset += offs
    last_mouse_pos = get_global_mouse_position()

Attached is a little video that shows what i mean (can’t upload since im a new user).

I don’t see an attached video.

It’d also be nice to see your scene tree with the camera node properties or let us know if you’re instantiating the camera programmatically.

1 Like

Hi thank you so much for answering. Unfortunately I can’t upload it says since im a new user (which is the case). But I will try to upload it on youtube or something. Edit - Link: https://1drv.ms/v/c/2c02bfa6495518cb/EfTE3c_7wg1DhHmj9vZDPD4BHvuJRNDrq-Ga1aBDc7slpw?e=zwLpS4

The Scene Tree looks like that:
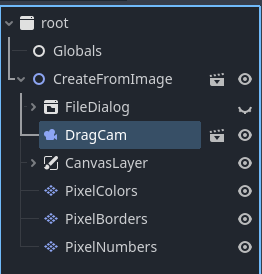
image

Basically its a coloring pixels clone. At first I select an image, and then i wrote an algorithm to find the top 10 colors of that image. The image then gets pixelized and each pixel gets a tile in the tilemap.

After scaling the image has 24576 pixels (so 24576 tiles in total).

Why 3 tilemap layers? One for the actual color, one for the number that is above the tile, and one for the border.

The script for the “main” logic (with comments):

class_name CreateFromImage
extends Node2D

@onready var pixel_colors: TileMapLayer = $PixelColors
@onready var pixel_numbers: TileMapLayer = $PixelNumbers
@onready var confirm_dialog: VBoxContainer = $CanvasLayer/ConfirmDialog

@onready var file_dialog: FileDialog = $FileDialog
@export var pixelation: int = 10

var modulated_tile_cache: Dictionary
var used_colors_cache: Dictionary
var number_counter: int = 1

var drawing

# for each unique color i create an alternate tile (base tile is 16x16 white rect)
func create_alternate_tile(color: Color):
	var source = pixel_colors.tile_set.get_source(0) as TileSetAtlasSource
	var alt_tile_id = source.create_alternative_tile(Vector2i.ZERO)
	var tile_data = source.get_tile_data(Vector2i.ZERO, alt_tile_id)
	tile_data.modulate = color
	modulated_tile_cache[color] = alt_tile_id

# 
func create_tiles_from_img(img: Image):
	drawing = Drawing.new()
	var pixels = []
	
	var w = img.get_width()
	var h = img.get_height()
	for x in range(w):
		var row = []
		for y in range(h):
			var color = img.get_pixel(x, y)
			
			if modulated_tile_cache.has(color):
				var alt_tile_id = modulated_tile_cache[color]
				pixel_colors.set_cell(Vector2i(x, y), 0, Vector2i.ZERO, alt_tile_id)
			else:
				create_alternate_tile(color)
				var alt_tile_id = modulated_tile_cache[color]
				pixel_colors.set_cell(Vector2i(x, y), 0, Vector2i.ZERO, alt_tile_id)
				
			
			var pixel_color = PixelColor.new()
			if used_colors_cache.has(color):
				var number = used_colors_cache[color]
				pixel_color.initialize(color, number)
			else:
				used_colors_cache[color] = number_counter
				var number = used_colors_cache[color]
				pixel_color.initialize(color, number)
				number_counter += 1
			var number = used_colors_cache[color]

			pixel_numbers.set_cell(Vector2i(x, y), 0, Vector2i(number - 1, 0), 1)

			var pixel = Pixel.new()
			pixel.initialize(Vector2i(x, y), pixel_color)
			row.append(pixel)
		pixels.append(row)
	drawing.initialize("test", pixels)


func reset():
	pixel_colors.clear()
	pixel_numbers.clear()
	used_colors_cache.clear()
	modulated_tile_cache.clear()
	number_counter = 1

func create_image(path: String):
	reset()
	var img = Image.load_from_file(path)
	
	var w = img.get_width()
	var h = img.get_height()
	
	
	img.resize(w / pixelation, h / pixelation, Image.INTERPOLATE_NEAREST)
	# kmeans to find the top 4 colors
	var palette = Utils._kmeans_generate_palette(img, 4, 4)
	# recolor the pixels to these 4 colors
	var new_img = Utils._apply_palette_to_image(img, palette)
	
	# create tiles from the scaled down (pixelated image)
	create_tiles_from_img(new_img)
	confirm_dialog.show()


func _on_file_dialog_file_selected(path: String) -> void:
	create_image(path)


func _on_button_pressed() -> void:
	file_dialog.popup_centered()

func store_drawing():
	#var file_name = "res://MyAwesomeDrawing.tres"
	#ResourceSaver.save(drawing, file_name)
	Globals.cached_drawing = drawing
	Globals.cached_alt_tiles = modulated_tile_cache
	Globals.cached_tile_set = pixel_colors.tile_set

func _on_ok_btn_pressed() -> void:
	store_drawing()
	get_tree().change_scene_to_file("res://play_scene.tscn")

I made an MVP scene using the default Window node, your DragCam code, etc and couldn’t replicate your issue using the code and tree structure you showed.

I don’t know the implementation of your Drawing, PixelColor, Pixel, Globals, or Utils classes. Is there a way you can trace the draw calls using the debug profilers?

Also, does the issue happen with different types of images? E.g. a really small image? I noticed in your video that you image is rather large.

1 Like

it this something?
‘’’
extends Camera2D

var mouse_down: bool = false
var last_mouse_pos: Vector2

Add limits for zoom

const MIN_ZOOM = 0.3
const MAX_ZOOM = 3.0
const ZOOM_RATE = 0.1

func _process(delta: float) → void:
# Handle zooming
if Input.is_action_just_released(“mouse_wheel_up”):
var new_zoom = zoom + Vector2.ONE * ZOOM_RATE
zoom = new_zoom.clamp(Vector2.ONE * MIN_ZOOM, Vector2.ONE * MAX_ZOOM)

if Input.is_action_just_released("mouse_wheel_down"):
    var new_zoom = zoom - Vector2.ONE * ZOOM_RATE
    zoom = new_zoom.clamp(Vector2.ONE * MIN_ZOOM, Vector2.ONE * MAX_ZOOM)

# Handle camera movement
if Input.is_action_just_pressed("mouse_middle"):
    mouse_down = true
    last_mouse_pos = get_global_mouse_position()
if Input.is_action_just_released("mouse_middle"):
    mouse_down = false
if mouse_down:
    camera_movement(delta)

func camera_movement(delta: float):
var current_mouse_pos = get_global_mouse_position()
var offs = (last_mouse_pos - current_mouse_pos) * zoom
position += offs
last_mouse_pos = current_mouse_pos

# Optional: Add limits to camera movement
# if you have a TileMap, you can get its bounds
# var limits = tilemap.get_used_rect()
# position.x = clamp(position.x, limits.position.x, limits.end.x)
# position.y = clamp(position.y, limits.position.y, limits.end.y)

You are right it only happens on bigger images. I tried with a smaller one, I don’t have that problem there. (total of 4096 pixels).
The one with total of 24576 pixels gave me the issue.

Anything in particular that I should trace? I don’t know where to begin or what I’m looking for exactly. I’m relatively new to Godot I should mention.

Tried that code, but it give me same problem. Only with big images. When I use a small one I don’t have this error.
This is the image I’m trying that on (its a free image from pexels pixelized to 10 → width & height divided by 10):

MVP Godot Project (one scene , 3 nodes, 1 script) attached in my github issue: Using too many tiles and a `Camera2D` will make `TileMapLayer` vanish on camera `zoom` + `offset` ¡ Issue #99953 ¡ godotengine/godot ¡ GitHub

Just zoom out to max and then use arrow down to scroll, then you will see the undesired effect.

If you guys have any ideas please let me know.

It seems a bit off… i tried a few tricks… but the one that came close was the following

‘’'extends Node2D

@onready var camera_2d: Camera2D = $Camera2D

const W = 128
const H = 192
const MIN_ZOOM = 0.3
const MAX_ZOOM = 3.0
const ZOOM_RATE = 0.1
const TILE_SIZE = 32 # Adjust based on your tile size

func _ready() → void:
create_grid()

func create_grid() → void:
var sprite_holder = Node2D.new()
add_child(sprite_holder)

for x in range(W):
	for y in range(H):
		var sprite = Sprite2D.new()
		sprite.texture = preload("res://Tile.png")  # Replace with your tile texture
		sprite.position = Vector2(x * TILE_SIZE, y * TILE_SIZE)
		if (x + y) % 2 == 0:
			sprite.modulate = Color.WHITE
		else:
			sprite.modulate = Color.GRAY
		sprite_holder.add_child(sprite)

func _physics_process(delta: float) → void:
if Input.is_action_pressed(“ui_down”):
camera_2d.position.y += 500 * delta

if Input.is_action_just_released("mouse_wheel_up"):
	var new_zoom = camera_2d.zoom + Vector2.ONE * ZOOM_RATE
	camera_2d.zoom = new_zoom.clamp(Vector2.ONE * MIN_ZOOM, Vector2.ONE * MAX_ZOOM)

if Input.is_action_just_released("mouse_wheel_down"):
	var new_zoom = camera_2d.zoom - Vector2.ONE * ZOOM_RATE
	camera_2d.zoom = new_zoom.clamp(Vector2.ONE * MIN_ZOOM, Vector2.ONE * MAX_ZOOM)