Hey, it’s starting to look pretty good. I have a reply to a couple of your responses.
Number 1
There is a difference between learning a shader language, and understanding the general concepts that are applied to compute the image of a game. If you get to know the applied concepts of computer imagery, learning a shader language will be much more manageable.
I suggest you research how a mesh is rendered onto the screen. Even though you’re working in 2D, your visual elements are likely internally rendered by using a quad mesh (a square mesh). Some of the following concepts will be of particular importance for your current problem:
- Color channels – red, green, blue, and alpha channels
- UVs – the coordinates used to map a texture onto a mesh
Number 3
I take particular issue with you saying that you “just dont want to mess it up”. If you are afraid of trying to solve stuff on your own, you will never learn how things work and won’t be able to think for yourself. Don’t expect that combining pieces of code that you’ve found on the internet is the best way forward. I’m not saying you shouldn’t use a pre-existing solution. In fact, you already have the solution (from your link). The problem is that you still can’t solve your problem. When that’s the case, it’s likely because you don’t understand what you’re doing.
Since you don’t understand “what the heck” you’re doing, I’ll try to outline the steps you need to take, and concepts you need to understand, to solve your problem.
Steps to solution
In the following section, I will provide code examples that mirror that of the shader you linked from Godot Shaders. Hopefully this will give you an understanding of what is going on in this, and other, shaders.
What you want to achieve
A shader that tints the color of a sprite and displaces the sprite based on a function or texture.
Tinting
You’ve already managed to tint your image – hooray. Hopefully you understand the lines I provided previously instead of just copy and pasting them.
vec3 mixedColor = color.rgb * mixColor;
Displacement
There are actually more than one approach you can use to displace an image. You can either displace the vertices of a mesh (in the vertex shader), or displace the UV coordinates used for your texture (in the fragment shader). The approach you should use depends on the effect you want to achieve.
UV Coordinates
A set of 2D coordinates (one for each vertex) in the range of [0, 1]. For any given texture the following coordinates and their positions are true:
[0, 0] = Bottom Left | [1, 1] = Top Right | [0, 1] = Top Left | [1, 0] = Bottom Right
For your reflection effect, you should displace the UV coordinates. This is rather trivial to do. Simply modify the UV values of your sprite. Here is an example:
	# Get the UV coordinates
	vec2 uv = SCREEN_UV;
	# ...and offset the UV by 2 pixels
	uv += 2.0 * SCREEN_PIXEL_SIZE;
	# Result: Texture is moved by 2 pixels.
The above example will only work for screen shaders since the built-in SCREEN_UV is used. To make it work for most other objects, you should use the mesh’s UVs instead with UV.
This above example is rather simple and will only achieve a simple result: an offset screen texture. The key to making more elaborate results is to use a variable instead of a constant for the displacement. The contents of this variable is up to you. To give you a starting point, here’s an example that uses a math function to displace the UVs.
	float offsetX = sin(UV.y * TAU * 1.0);
	vec4 color = texture(TEXTURE, UV + vec2(offsetX, 0.0));
	COLOR = color;
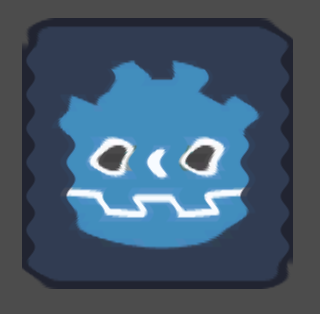
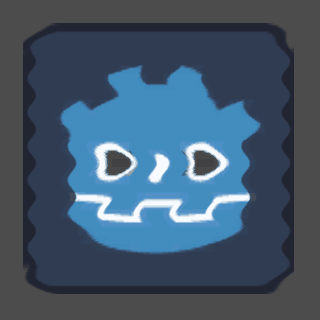
The Godot logo before and after the shader is applied.
Clearly, something is wrong. Perhaps we should dial down the strength of the displacement a little, and increase the frequency of the sine wave:
float offsetX = sin(UV.y * TAU * 8.0) * TEXTURE_PIXEL_SIZE.x * 2.0
It now looks much better. Scaling the offset with a value that is based on pixel size is much more reliable. The frequency of the waves is up to you. As mentioned, you can easily use other values to modify the UVs. The world is your oyster!
But there is still an issue; the borders of the sprite is clipped. The cause of this issue is the image which is too close to its own borders. With less space around the image, there is less room to offset its pixels. It is important to bear this fact in mind when creating sprites for displacement purposes – in your case it may be many.
Sidenote
I can imagine another way in which this issue of small borders can be alleviated, but it would require a solution that is much more involved; a solution that is outside the scope of this issue.
A final effect you may want to add is for the displacement to travel over time to make it look like the water is affecting the reflection (the keyword is time). This can be done with the use of the built-in TIME constant
float offsetX = sin(TIME + UV.y * TAU * 8.0) * TEXTURE_PIXEL_SIZE.x * 2.0
Here is some helpful reading for programming Godot shaders:
Let me know if you have any further questions.