UV Tiling Workflow, Blender to Godot
A workflow tutorial for an interesting Texture2DArray technique.
All files for this tutorial are available on my repo.
Intro
This is a way to apply textures which have been placed into a square image (tiled) onto your meshes in Blender and get the same result in Godot upon export.
The Tiling Texture
Start by making a tiled image. I used Kenny’s Textures and made this in an image editor:
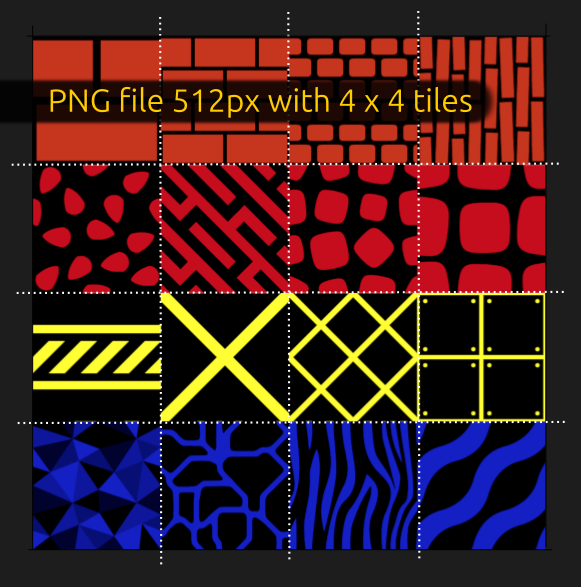
Stick to powers of two for the width and height and make sure the image is square, with each tile as a subsquare.
Blender
In Blender, model something. I used the cube and gave it some loop cuts and scaled the top face.
The Blender Shader
In order to see what is going on, you will need a Material. Create one and use nodes.
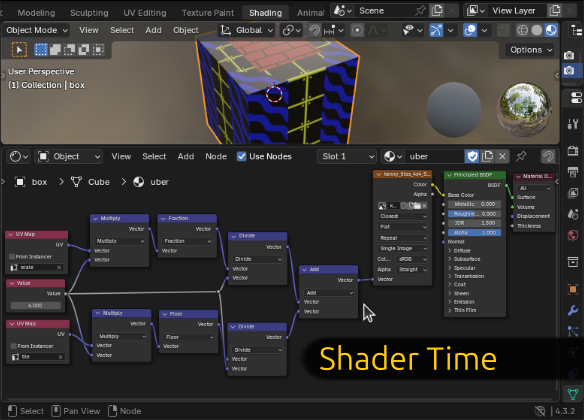
The image is the tiled texture you made earlier.

Adding the UV Maps
Now add four uvmaps to your model, in the Data tab. (See the diagram.) Name them:
- uv1
- uv2
- scale
- tile
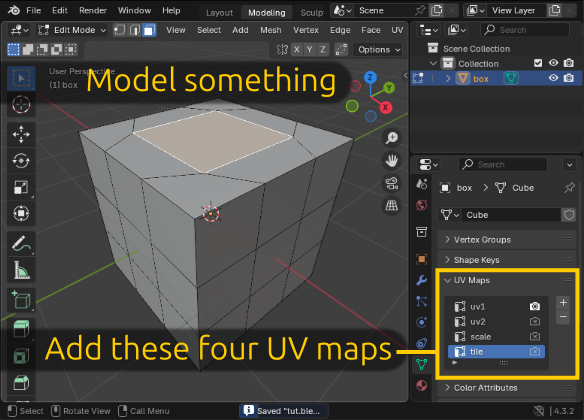
uv1 and uv2 are available for you to do other things with. We will use uv3 (scale) and uv4 (tile) to create the shaders in Blender and Godot.
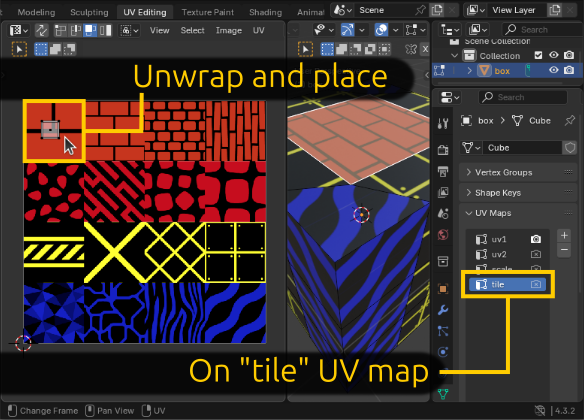
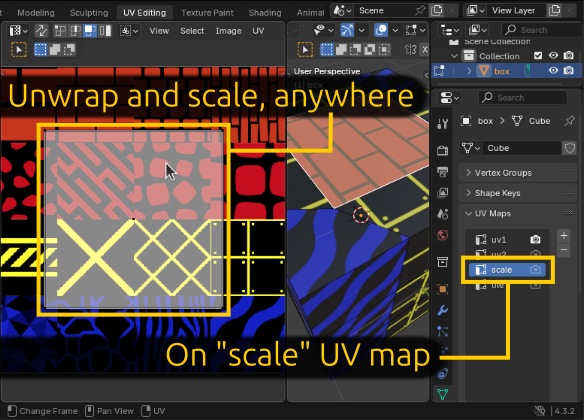
Unwrapping and Choosing Tiles
from the UV Editing Panel, the flow is: Tile and then Scale
Ensure that you select the
tilemap while you do these steps!
- In Edit Mode, select the faces you want to assign a texture to.
- Unwrap (Press “u” and choose an option). It’s not important for the tile map.
- In the UV Editor, select all the faces and scale them down so they fit within the tile you wish to use. (See diagram.)
- Keep doing this until you are done.
Unwrapping and Scaling/Rotating
Choose the
scalemap!
- You do much the same, select faces, unwrap and then manipulate them in the UV Editor.
- The position on the UV map does not matter, only the scale and rotation.
Save/Export
You can either export your model as a .glb file or simply save the blend file and let Godot import that. Up to you.
Godot Time
When you start Godot, assuming the blend or gdb files are ready, it should do an import.
While we made a material in Blender, we are not going to use it in Godot. We will make our own shader to decode the
scaleandtileuv maps.
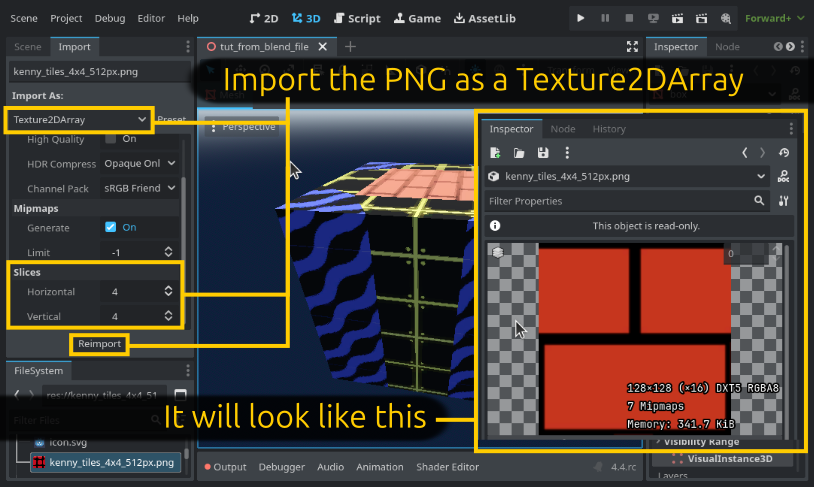
Turning the Texture File into a Texture2DArray Resource
The first step is to reimport the texture file. Use the Import tab (Next to Scene) and select the texture file in the filesystem.
You need to choose Texture2DArray and then set the Slices to fit your image. I used 4.
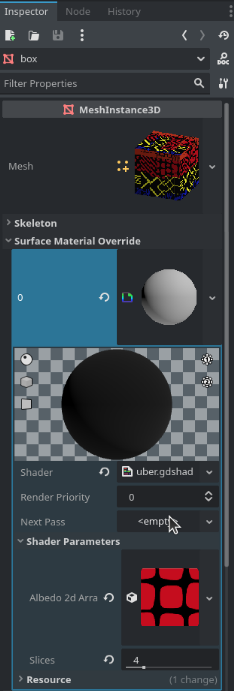
Making the Shader Material
Make a new Shader Material and then start a new Shader. The code is below.
The Shader Code
Copy and paste this, or just use my project from the link at the top of the article.
I commented it quite, well. It’s worth a read.
/*  MIT License

 Copyright (c) 2025 Donn Ingle (dbat@disroot.org)

 Permission is hereby granted, free of charge, to any person obtaining a copy
 of this software and associated documentation files (the "Software"), to deal
 in the Software without restriction, including without limitation the rights
 to use, copy, modify, merge, publish, distribute, sublicense, and/or sell
 copies of the Software, and to permit persons to whom the Software is
 furnished to do so, subject to the following conditions:

 The above copyright notice and this permission notice shall be included in all
 copies or substantial portions of the Software.

 THE SOFTWARE IS PROVIDED "AS IS", WITHOUT WARRANTY OF ANY KIND, EXPRESS OR
 IMPLIED, INCLUDING BUT NOT LIMITED TO THE WARRANTIES OF MERCHANTABILITY,
 FITNESS FOR A PARTICULAR PURPOSE AND NONINFRINGEMENT. IN NO EVENT SHALL THE
 AUTHORS OR COPYRIGHT HOLDERS BE LIABLE FOR ANY CLAIM, DAMAGES OR OTHER
 LIABILITY, WHETHER IN AN ACTION OF CONTRACT, TORT OR OTHERWISE, ARISING FROM,
 OUT OF OR IN CONNECTION WITH THE SOFTWARE OR THE USE OR OTHER DEALINGS IN THE
 SOFTWARE.
 A tool to show the index of each 3d vertex, in a mesh, visually.

Original code from: https://lexpartizan.dreamwidth.org/415.html
No licence is mentioned.
*/

/*
There are 8 uvmaps in Godot 4 now:
https://docs.godotengine.org/en/latest/tutorials/shaders/shader_reference/spatial_shader.html#vertex-built-ins

This example is not using..
UV = blender slot 1
UV2 = blender slot 2
..but is using slots 3 and 4.
*/

shader_type spatial;

render_mode blend_mix,depth_draw_opaque,cull_back,diffuse_burley,specular_schlick_ggx;

uniform sampler2DArray albedo_2dArray : filter_nearest_mipmap;
uniform lowp float slices: hint_range (1.0, 16.0, 1.0);

// These two are 'varying' because we pass them from vertex -> fragment
varying lowp vec3 vertex_color;
varying lowp vec3 uv;


void vertex() {
	// Just in case there are also vert colors
	vertex_color = COLOR.rgb;

	// CUSTOM0.xy = blender uv 3 slot (scale)
	vec2 scaleuv = CUSTOM0.xy;
	// CUSTOM0.zw (ZED THEN W-YOU) = blender uv 4 slot (tile)
	vec2 tileuv = CUSTOM0.zw;

	// tile_offset is the (column, row). Goes from 0,1,...
	vec2 tile_offset = trunc(tileuv * slices); //trunc makes it int like

	// Works out index into the Texture2dArray.
	// 3 x 3 source image's indexes looks like this:
	// 0 1 2
	// 3 4 5
	// 6 7 8
	lowp float tile = tile_offset.x + (slices * tile_offset.y);

	//Stuff that plus the scale into a vec3 uv var.
	uv= vec3 (scaleuv * slices, tile);
}

void fragment() {
	// Sample the actual texture
	ALBEDO = texture(albedo_2dArray, uv).rgb * vertex_color;
}
Be sure to drop your Texture2DArray (that you made earlier) into the albedo_2dArray slot and also set the slices appropriately.
Once this is all done, you should see your model looks like the one you made in Blender.
From here on, you can go back to Blender, model and texture and save, and Godot will just reimport and keep track.
Troubleshooting
I have had some weirdo-moments where the model in Godot looks wrong. Sometimes it’s just one face, other times the entire thing.
I have noticed that restarting Godot helps. Also make sure you are placing your tile uvs (in Blender) strictly well-within the tiles you choose.
I hope you don’t run into any trouble!
HTH
dbat.
Credit
I found this entire technique on this page: Original code from lexpartizan.
It was quite hard to understand and I spent a lot of time getting it all to work. They have other interesting ideas. Go check them out!
(Beware the download links to yandex.ru on that page.)