Those are very kind words. Thank you. Sorry it took me so long to get to this, I spent the weekend replacing my broken CPU cooler.
General Thoughts
First, naming is a very powerful thing in programming. What we name things tends to direct how we shape things. I talk about the Manager Anti-Pattern at length on this forum. (That link will take you to a post that links the other posts as well.)
In this case, you need to carefully define what you mean by “component”. Like @normalized said, you should start by coding things, and then see where they intersect - then refactor. (More on that in a second.) What concerns me about your initial post is I get the impression that in your head “Input Component” is synonymous with “Input Manager”.
Think of a component as an add-on upgrade package to a car. You want the sun roof? We can add that on as a component. But that doesn’t change how the rest of the car functions. It does change the air resistance and drag when open, and will affect fuel consumption and mileage. But it has no effect on the gas pedal, the steering wheel, etc.
When you are creating a component ask yourself, “Is this an add-on to the basic functionality of an object?” If it can be added and removed without affecting other things, the answer is yes.
Now take the Health Component example @vonpanda linked to above. This can be added and removed without affecting the Player’s other functions, it will in fact make the Player invulnerable without it because they cannot take damage. It is possible to use components to make up an object of more complexity that is its own thing.
Thoughts on Input and Movement Components
Godot has a way of doing things, and while most of it is node-based, not all of it is. You discovered this when you asked:
Here’s the thing: The _physics_process() function is already a movement component. It is an optional thing you can override, and in doing so, alter the physics of the object to which it is attached. There are also already four input components: _process(), _physics_process(), _input(), and _unhandled_input(). They can all handle input every frame.
So let’s take a look at your code:
func _physics_process(_delta: float) → void:
	movement_component.move_direction = input_component.move_input
	movement_component.wants_jump = input_component.jump_pressed
	input_component.update()
	movement_component.tick(delta)
(By the way, you made delta private indicating you aren’t using it, and then pass it later as an argument without the preceding underscore. So this code would throw an error.)
Now let’s take a look at what it (hypothetically) would look like if you didn’t have those components. (Based on the default CharacterBody3D code with some tweaks.) The first thing you do is get input and pass it to be stored for movement. So we can do:
var input_direction := Input.get_vector("left", "right", "up", "down")
var direction := (transform.basis * Vector3(input_direction.x, 0, input_direction.y)).normalized()
Then on the second line, you check for jumping. We can do:
if Input.is_action_just_pressed("jump") and is_on_floor():
	velocity.y = 4.5
On the third line, I don’t know what you’re doing.
On the fourth line you apply the movement. We can handle gravity:
if not is_on_floor():
	velocity += get_gravity() * delta
And handle movement:
if direction:
	velocity = direction * 5.0
And do all the physics updates:
move_and_slide()
So, we have 9 lines of code instead of 4. That’s certainly more - more than twice as much. But is it clearer?
func _physics_process(delta: float) -> void:
	var input_direction := Input.get_vector("left", "right", "up", "down")
	var direction := (transform.basis * Vector3(input_direction.x, 0, input_direction.y)).normalized()
	if direction:
		velocity = direction * 5.0
	if not is_on_floor():
		velocity += get_gravity() * delta
	if Input.is_action_just_pressed("jump") and is_on_floor():
		velocity.y = 4.5
	move_and_slide()
(Note that the order is changed so we can overwrite velocity.y after setting it to 0.)
It’s a little clearer, but it could be better. We have Magic Numbers, and no line spacing. Let’s fix that:
class_name Player extends CharacterBody3D

@export var speed: float = 5.0
@export var jump_velocity: float: = 4.5


func _physics_process(delta: float) -> void:
	var input_direction := Input.get_vector("left", "right", "up", "down")
	var direction := (transform.basis * Vector3(input_direction.x, 0, input_direction.y)).normalized()
	if direction:
		velocity = direction * speed

	if not is_on_floor():
		velocity += get_gravity() * delta
	if Input.is_action_just_pressed("jump") and is_on_floor():
		velocity.y = jump_velocity

	move_and_slide()
We are now at 18 lines of code (5 of which are newlines). It’s pretty clear what everything does. In your component version, let’s say that your character isn’t moving. To debug it, you’d have to go look at the input code and then the movement code. Not the end of the world, but it increases Cognitive Complexity and Cognitive Load. This means it’s harder to read the code, which causes frustration. Future-proofing, which @normalized mentioned, often causes us to create clever solutions that are hard to decipher and remember why those changes were made.
When you are thinking about encapsulating code into an object (such as a component), you should be asking yourself, “Does this reduce the cognitive load for my future self?” This is because 90% of the time, the person who is going to be frustrated by your unreadable code is you, and 10% of the time the people with which you work. (That goes up to 99% on a solo project obviously - the other 1% being the people on the Internet who try to help you when you post code.)
So now we get to your two final questions:
The answer is yes, but mostly - no. You are asking the right questions. It’s your conclusion that is incorrect. That doesn’t mean your solution won’t work - just that it is overly complex. It is being clever for the sake of being clever.
We see this pop up a lot on here. It generally presents itself as the XY Problem. People come up with what they perceive is a clever solution to a problem (X). Then they have a problem (Y) with that solution. They then post, asking for help with the new problem (Y) they’ve created. What ends up happening is one of three things:
- They listen to us, describe problem X, and get a much simpler solution for it.
- They argue with us, and get a solution to problem Y that seems to solves their problem, but then have another problem down the road because their solution is overcomplicated and doesn’t leverage the Godot engine.
- They argue with us and do not get a solution to problem Y and go away unhappy.
You however, have done the best thing. You said, “This is what I’m thinking. Is there a better way?” And you’ve clearly been open to feedback.
It should not.
There are a few reasons for this:
- Primitive data type variable like
floatandVector3are passed by value. This means that you are storing them twice in memory by passing them the way you are. - It increases Cognitive Complexity, like we discussed above.
Thoughts on @vonpanda’s Response
I think the warning at the end is important, but I wanted to also comment on one of the beginning paragraphs, because I think there’s a lot of meat there.
You can do this, and the abstract keyword can help; however, in my experience when you start by creating an Abstract Class, that is a red flag. As @normalized said, you should be refactoring into one - not starting with one.
I do think, as @vonpanda said, that you should use the Godot Editor UI whenever possible. @export variables are GREAT for that. I do think that one of the indications of an advanced Godot user (as opposed to just an advanced developer - which many of us are coming into Godot) is knowing when to use @onready vs @export variables.
My Solution
So my solution is to use a Node-based state machine. You can check out my State Machine Plugin and use it or steal from it. It is a pull-based state machine. Most that you encounter are push -based, in which the machine determines which state should be active. In a pull-based machine, the states decide when they should be entered, and the machine itself just changes states.
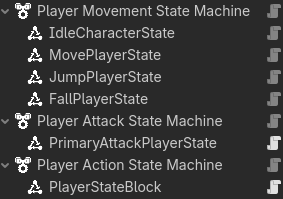
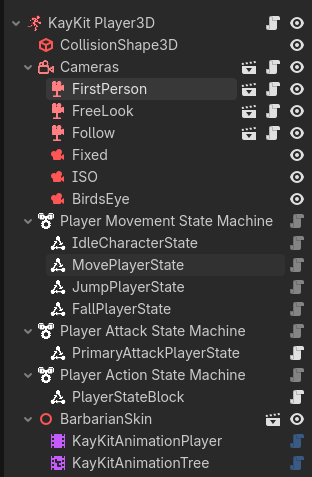
So this is the current state machine I am developing for my revamp of my Character3D Plugin. You’ll note there are three machines. This is so the player can do more than one thing at a time. In this case, movement, attacking and blocking.
Here’s the code for my the KayKitPlayer3D, which inherits from KayKitCharacter3D, which in turn inherits from CharacterBody3D.
class_name KayKitPlayer3D extends KayKitCharacter3D

## The speed at which the player turns.
@export var turn_speed: float = 20.0

var direction := Vector3.ZERO
var rig: Node3D

@onready var cameras: Cameras = $Cameras


func _ready() -> void:
	rig = skin.get_child(0) #Assumes the rig is the first node in the skin.
	_set_head_visibility_layer(rig, 2) #Make it so in 1st person mode the head is invisible.
	Input.mouse_mode = Input.MOUSE_MODE_CAPTURED


func _physics_process(delta: float) -> void:
	if velocity.length() > 1.0 and direction != Vector3.ZERO:
		look_toward(direction, delta)

	move_and_slide()


#Move this to the rig code?
func look_toward(direction: Vector3, delta: float) -> void:
	var target := rig.global_transform.looking_at(rig.global_position + direction, Vector3.UP)
	rig.global_transform = rig.global_transform.interpolate_with(target, 1.0 - exp(-turn_speed * delta))
This is KayKitCharacter3D
## Base character class for KayKit Models - used for Players, NPCs, and Enemies.
class_name KayKitCharacter3D extends CharacterBody3D


## The character skin to use.
@export var skin: Node3D
@export var animation_tree: KayKitAnimationTree
#Movement export variables
@export_category("Movement")
## The character's base walk speed.
@export var base_speed: float = 6.0

var speed = base_speed


## Applies gravity to the character. The gravity multiplier can be used when jumping or falling
## to make the character rise slower or faster, or to fall like a rock or a feather.
## This function uses get_gravity() so that it is affected by Area3D nodes that
## might also apply a localized gravity.
func apply_gravity(delta: float, gravity_multiplier: float = 1.0) -> void:
	velocity += get_gravity() * delta * gravity_multiplier


func set_move_state(move_state: GameConstants.MoveState) -> void:
	animation_tree.set_move_state(move_state)


func trigger_animation(animation: GameConstants.AnimationType) -> void:
	animation_tree.trigger_animation(animation)


func block_toggle(forward: bool) -> void:
	var tween = create_tween()
	tween.tween_method(animation_tree.block_change, 1.0 - float(forward), float(forward), 0.25)
As you can see, there is no input or movement code.
This is the MovePlayerState code:
class_name MovePlayerState extends PlayerState


func _activate_state() -> void:
	super()
	set_process(true)


func _enter_state() -> void:
	super()
	character.set_move_state(GameConstants.MoveState.RUN)
	set_physics_process(true)


func _exit_state() -> void:
	super()
	set_physics_process(false)


## If the player has directional input, move to the Move state.
func _process(_delta: float) -> void:
	character.direction = _get_input_direction()

	if not is_current_state() \
	and character.is_on_floor() \
	and character.direction \
	and not get_current_state() is JumpPlayerState:
		switch_state()


## Handles movement and animation
func _physics_process(_delta: float) -> void:
	character.velocity.x = character.direction.x * character.speed
	character.velocity.z = character.direction.z * character.speed


func _get_input_direction() -> Vector3:
	var input_dir := Input.get_vector(GameConstants.INPUT_MOVE_LEFT, GameConstants.INPUT_MOVE_RIGHT,
									GameConstants.INPUT_MOVE_FORWARD, GameConstants.INPUT_MOVE_BACKWARD)
	var input_vector := Vector3(input_dir.x, 0, input_dir.y) #.normalized()
	return character.cameras.get_facing(input_vector, character.transform.basis)
Let me show you the entire scene, and then I’ll explain how it works.
When the StateMachine’s parent node is ready, it activates all the states. This is because all nodes are created top down, and then _ready() is run bottom up. So KayKit Player3D is created, then Player Movement State Machine is created, then MovePlayerState is created. MovePlayerState calls its _ready() function, and neither of the other two have been called yet, so it cannot reference them fully. Nor can it be guaranteed that any other nodes in the scene have been initialized.
So the only thing it does is turn off the _process(), _physics_process(), _input(), and _unhandled_input() functions from processing. In this way we don’t start running things we shouldn’t - and we don’t get errors trying to access the KayKit Player3D’s functions or variables before it is ready.
However, once KayKit Player3D runs its _ready() function, it sends out the ready signal - which means the entire scene is ready. At this point, the Player Movement State Machine activates all the State nodes attached to it.
MovePlayerState
MovePlayerState when activated, assigns the character variable as reference to KayKit Player3D, and turns on the _process() function. (The first thing happens in the CharacterState code, which it inherits in turn through the PlayerState.)
CharacterState Code
## State for a Character (Player/NPC/Enemy
class_name CharacterState extends State

## The Character this CharacterState operates on.
var character: KayKitCharacter3D


# Assigns a value to character once the state has been activated.
func _activate_state() -> void:
	super()
	character = _state_machine.subject
Every process tick, this state monitors movement input, and if it gets any, returns it and assigns it to the KayKit Player3D’s direction variable.
It then evaluates whether it is the current state, the character is on the floor, the character has an input, and the current state is not JumpPlayerState. (I discuss plans to refactor this out below.) If all these are true, this state requests to be the current state.
Providing that the Player Movement State Machine moves to the MovePlayerState, its _enter_state() function is run. (The only time it typically does not change states is if its in the Hurt or Death state - not pictured here.) The MovePlayerState then tells the KayKit Player3D to change its animation, and turns its own _physics_process() function on.
The MovePlayerState’s _physics_process() - which only runs while the State is active - updates the KayKit Player3D’s velocity every frame.
When the MovePlayerState exits, its own _physics_process() function is turned back off.
This encapsulates the MovePlayerState to only handle movement. If I had a run button, I could create a RunPlayerState to handle that if I wanted, or put the walk/run switch in the MovePlayerState. If I wanted the run ability to be something the player gained later in the game, I’d make it separate and add the node when the player unlocked the ability. If it was basic functionality, I’d combine the two.
You may have deduced that this function does not run when the player is in the air. Air control is not under the purview of this State Instead, that is handled by the JumpPlayerState and the FallPlayerState, both of which handle applying gravity and movement when they are active. In this way I can tweak gravity on the way up and down. For example making the Player jump quickly and float down with lots of air control like Princess Peach in Mario Bros., or I can make them jump slowly and fall even faster. Or anything in between.
This Modularization allows me a lot of control on what gets added, and makes making new states really easy. While a State does know about the Node it operates on (and maybe some of its components), it is not dependent on the other states and knows nothing (or very little) about them. (MovePlayer state is currently an exception, but I’m planning on making it test vertical velocity instead of testing for JumpPlayerState.)
Component Use Cases
There are lots of ways to create components. My Camera3D Plugin uses inheritance to create first- and third-person cameras. When I made my Camera2D Plugin, I started with a BoundCamera2D - following the same inheritance model. I’d used it in a game, and it took a TileMapLayer as an argument and kept the camera’s bounds within the rectangle described by the placed tiles. But it also had zoom and pan functionality - something I didn’t always want. That’s when I realized I could make components.
Each one, when attached to a Camera2D gave it new abilities that I can customize in the Inspector.
I now have plans to go back and create components to add to a Camera3D so that I can just make it a first-person or third-person camera. I’m also thinking about ideas for how to attach a component that switches between camera views - and whether that makes more sense than the Cameras node that currently handles it (and is a component already itself).
Command Pattern
Another thing you can look into if you really want to compartmentalize input and movement, is the Command Pattern discussed here. Basically, you filter all the enemy decision-making into input that looks like player input, and then you would have a PlayerInput component and an EnemyInput component. It would create the input necessary for character movement with the same interface. It could theoretically reduce your code complexity.
However, as I’ve looked into it, it’s a lot of work to turn enemy AI code into something that looks like player input. At least so far. Still, based on what you and @vonpanda were talking about - this would be the path to go down if you really want to follow the idea of Input and Movement components.
Conclusion
In the end, there’s lots of ways to do things. Godot has certain ways that are easier, because you can leverage the existing architecture. I always recommend starting there. But as you can see, there’s more than one way to encapsulate a cat.