Note: This is a long post with large screenshots. I hope that’s ok for this forum. If I should have added some kind of content cuts, please let me know how or feel free to edit it however is needed.
Animating 2D skeleton deformations with Polygon2D’s is a really cool feature in Godot, and can let you do things that are otherwise only available in 3D. However, it’s not extensively documented, and the UI can be challenging. The docs have a well-written introduction to the topic (the updated docs for Godot 4 were never merged, but most of it is the same). But it doesn’t go beyond the basics, leaving you with “experiment” as your next step.
I posted a few weeks ago looking for a kind of beginner/intermediate guide that covered this in more detail, but didn’t receive any replies – likely because it doesn’t seem to exist. I haven’t found any tutorials that go beyond what the docs cover. I even tried to hunt down the PR that added internal vertices in 2019, hoping there might be some discussion there, but could only find the commit.
However, since I first posted for help, I’ve worked with a lot more Polygon2D’s, and can share some findings that aren’t documented elsewhere. Since this is the information I’d been looking for when I was starting this project, hopefully it can save the next person some time in the future.
I’m also hoping that this thread might attract some more experienced users who can share more tips or correct me on points I’ve gotten wrong.
These tips assume you’re familiar with 2D Skeleton: Deforming the polygons and/or have some experience using Polygon2D’s with Skeleton2D in Godot 4.
The examples are from a jam game/work in progress. They aren’t intended as any kind of best practices for animations, and certainly not for art, just as examples of the process.
(I’m currently re-creating these characters in 3D, and most of this process is much faster and easier in Blender, and looks much better. However, there are other parts that are much slower and harder in 3D, so I would still use Polygon2D deformations again in the right circumstances.)
Use version control
Use version control, and make a commit every time you have something you like better than the last commit. Undo isn’t fully implemented in the Polygon2D editor, and you also can’t undo overwriting Skeleton2D’s rest pose, so you can lose a lot of work with a single click and ill-timed save.
Why bones? Why not just animate the vertices?
Bones are nice because they’re reusable. In my case, I could have multiple Polygon2Ds for different characters and clothing, and swap them out without having to remake the animations.
For even more versatility, you can swap the textures only. You can position the external vertices with a wide margin of transparency to cover all possible textures you’ll need. This has the downsides of needing the textures to be aligned precisely, not having as fine control, and unnecessary drawing of transparent pixels. But can be worth it in the right circumstances.
Both Krita and Inkscape have batch export functions that can be set up to handle the precise alignment required for this texture swapping. In Krita, use the Batch Exporter’s t=none parameter to prevent trimming. In Inkscape, place a clone of a transparent rectangle in every exported layer that will define the desired image size.
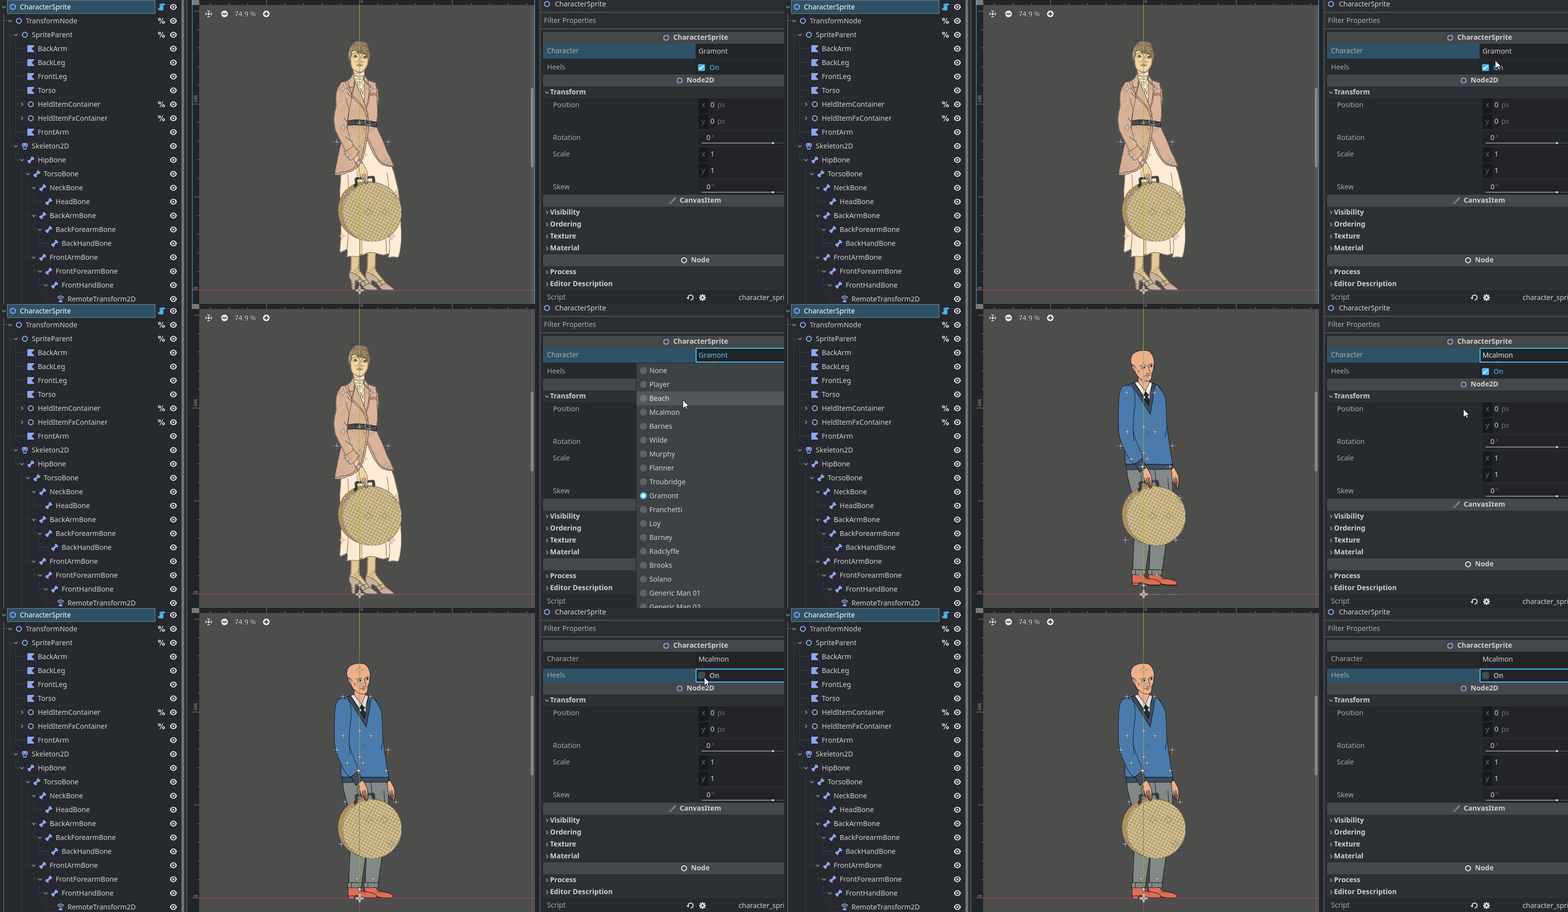
An example of swapping character textures on Polygon2D’s in the editor using a tool script:
Topology
topologyguides.com is a nice reference for 3D topology, and I imagine some of the lessons should apply here as well. Unfortunately, changes to the Polygon2D beyond repositioning vertices often require erasing and recreating other polygons and bone weights, so it is a challenge to isolate the effect of specific topology on your deformations.
In addition, Godot has to turn everything into triangles eventually for the graphics card, and I think this may be done at an early stage in the process. In doing so, it seems it may add its own internal vertices as well(?).
Therefore, it is unclear to me what difference non-triangle shapes make in the appearance of deformations. And I am also not sure whether Godot subdivides triangles you’ve drawn or keeps them intact. So, beyond the extra vertices from smaller triangles allowing finer tuning of bone assignments, I am not clear on how much, or if, triangle size effects the outcome of the deformation.
I can say I have not seen benefit from adding more than one internal vertex at a joint.
If anyone has some insight to share here, I’d appreciate it!
A few practical lessons learned for topology:
- External vertices can only be added BEFORE any internal vertices are added or custom polygons are drawn. This means that having to add an external vertex later comes at the cost of deleting all your other work. To avoid this, you might want to err on the side of creating extra external vertices in the beginning, whether or not you’ll need them. You can change their position later without loss of work. (This comes at the cost of extra triangles, but, if you’re working in 2d, triangle count may not be a limiting factor for your frame rate.)
- In the Points tab, once you’ve drawn any custom polygon, the texture will only be visible in regions where polygons exist. This means if you are remaking your polygons and adding extra internal vertices later, you may be doing so blindly. So just place them somewhere close to where you want them, create new polygons using them, and then reposition them now that the texture has reappeared.
An efficient workflow for creating new Polygon2Ds:
- Create a Sprite2D, assign your texture, and change the offset to top-left(1).
- Then use the Sprite2D drop-down in the 2D scene editor to convert it to a Polygon2D. Use the slider to simplify, as it creates numerous overlapping vertices at high complexities. But avoid simplifying too much, as having extra external vertices may be useful later.
- Add your internal vertices.
- Create single large many-sided polygons to cover the areas that are under the influence of only one bone and aren’t being internally deformed. Let Godot triangulate them later.
- Create smaller polygons around the joints.
Alternative workflow: The Auto Polygon2D Triangulation can automatically triangulate for you, but it doesn’t preserve your manually created ones. It retriangulates for an individual Polygon2D whenever the Polygon2D is newly selected in the scene editor. You can toggle the plugin on after you first create the Polygon2D to get initial polygons, then toggle it off and manually remake the polygons at the joints only. This can save time, but you need to be careful with it to avoid losing your work.
The pivot point
The position of the pivot point is vital in determining how the mesh deforms.
In 2D cutout animation, the Sprite2D’s pivot point/offset automatically matches the bone’s position when it’s a child of the bone or linked via a RemoteTransform2D.
In mesh deformation, however, the Polygon2D is located elsewhere in the tree. The node itself does not directly inherit the transforms (and that wouldn’t work, anyways, since it needs to be influenced by multiple bones). Instead, the global position of the bone determines the pivot point for the vertices influenced by that bone.
Global position is important here. It allows flexibility if you need the Polygon2D be positioned at an offset. All that matters is that the bone’s origin visibly lines up with the desired pivot.
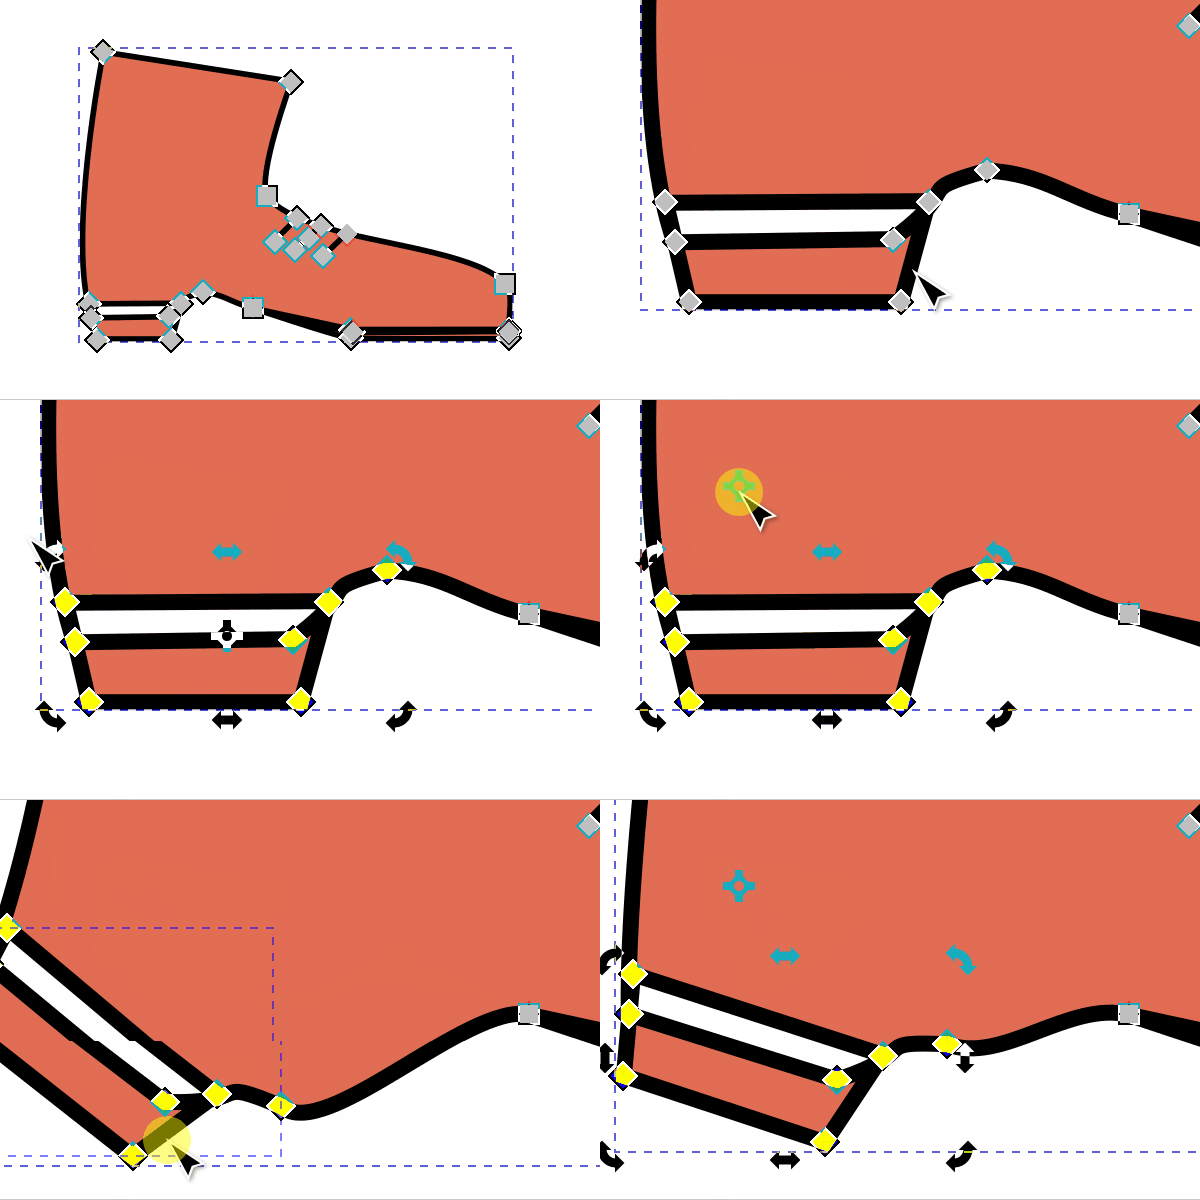
The bone’s transform at rest matches the original non-deformed polygon. If you move or rotate the bone, the polygon will deform. However, if you then overwrite the rest pose with the current transform, the polygon will revert to its original non-deformed shape.
This allows you to edit the location of the bone without losing your work, even after you have already assigned bone weights(2). This is important because the exact position may require detailed tweaking for good results.
Just make sure your entire skeleton is in rest position before you begin making changes so you don’t accidentally apply a new rest position to other bones.
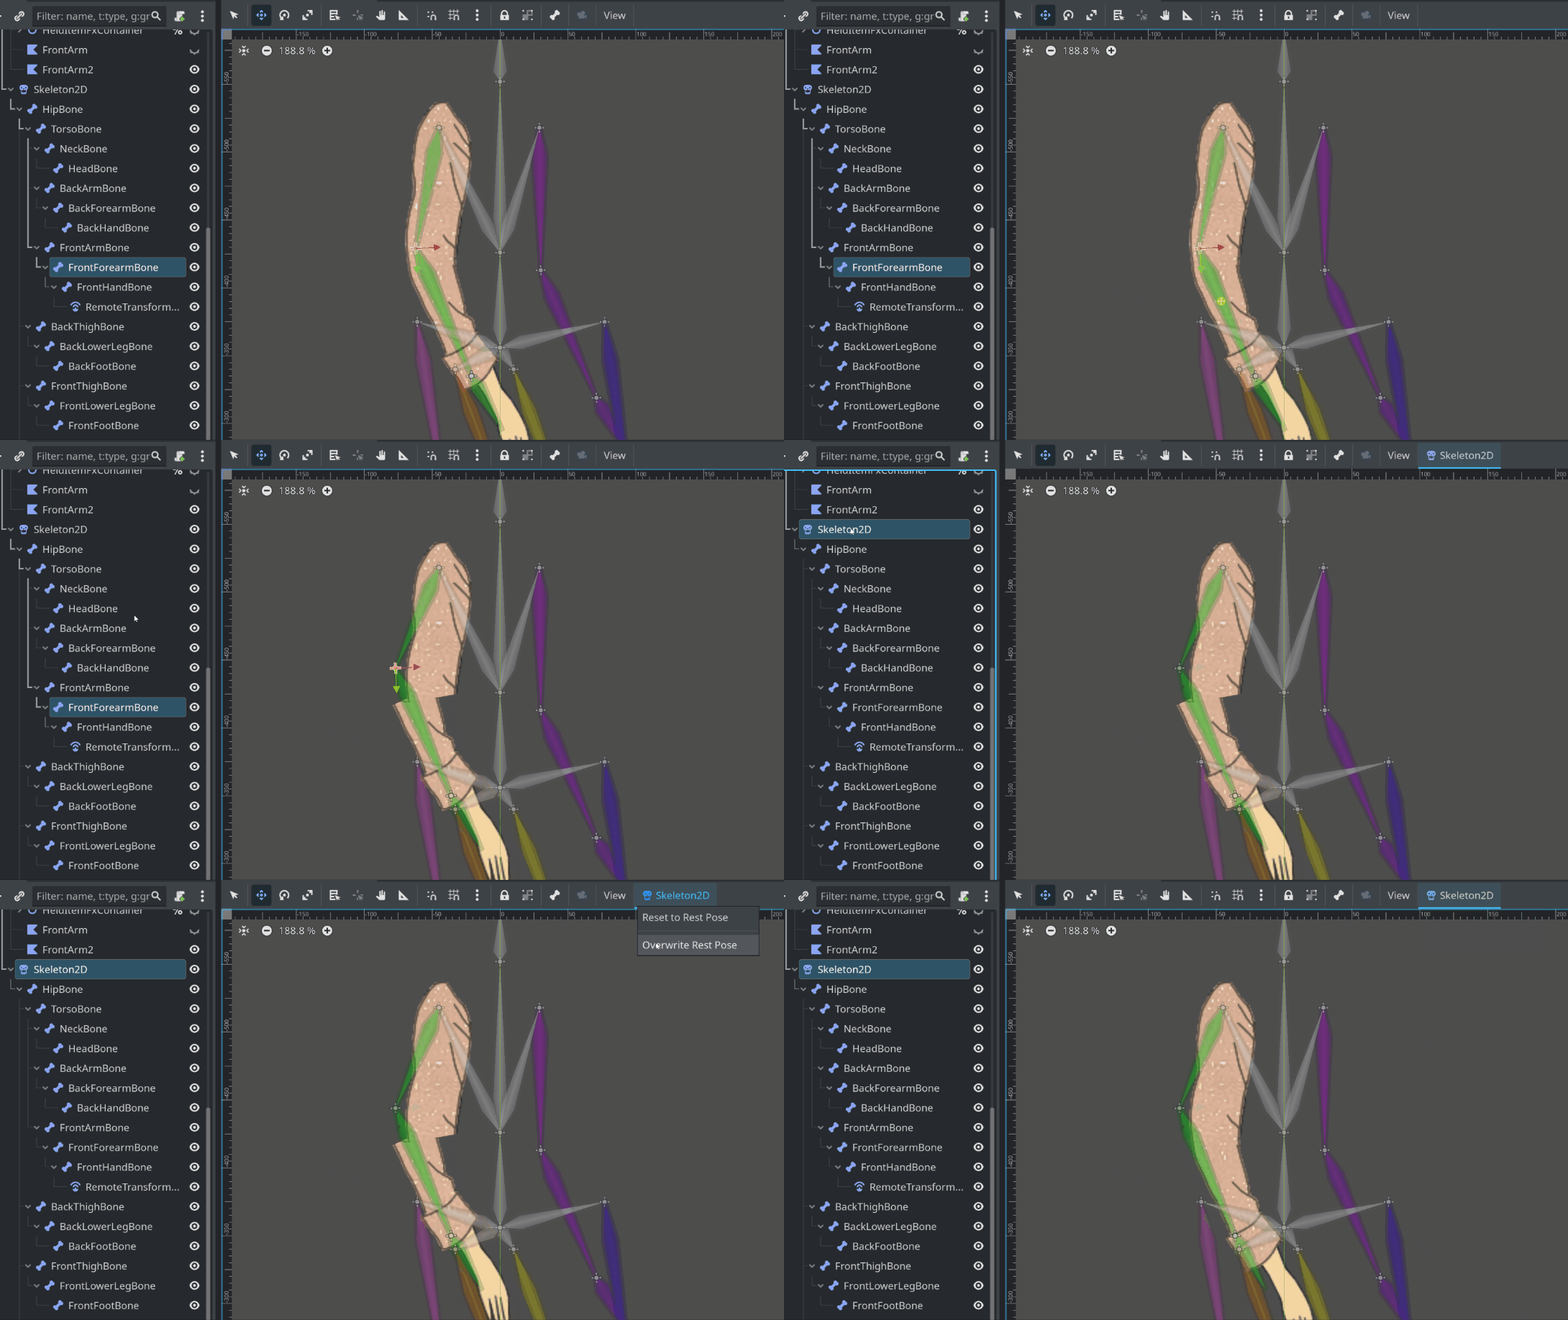
To conceptualize how the bone transform propagates to the vertices, it seems to be similar to this workflow in Inkscape: selecting multiple nodes inside a path, positioning the pivot where the bone would be, and rotating/scaling/repositioning using transform handles.
Bone weights
Bone weights matter… a lot. Sometimes you only have one bone assigned to each vertex and you’re done. But, in many cases, you have to tinker quite a bit with the relative weights of multiple bones to get a good result. Sometimes adding/subtracting a tiny fraction of influence can make a large difference.
Fortunately, the workflow is not as hard as it seems at first. It is not immediately obvious since the large Polygon2D editor window covers up the scene, but the results of your bone painting update in real time in 2D scene editor.
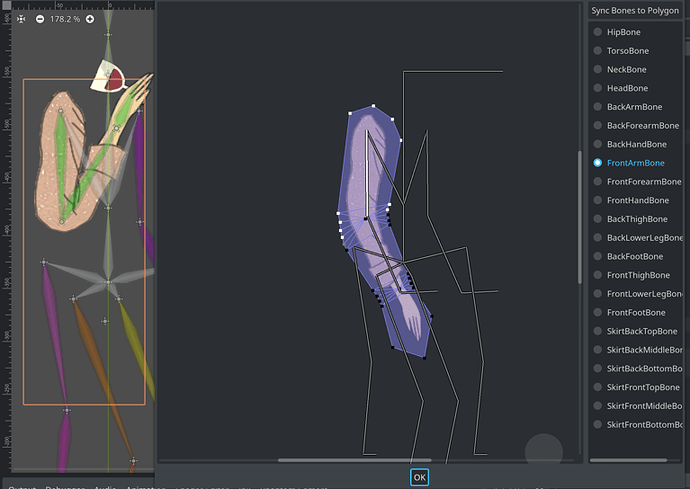
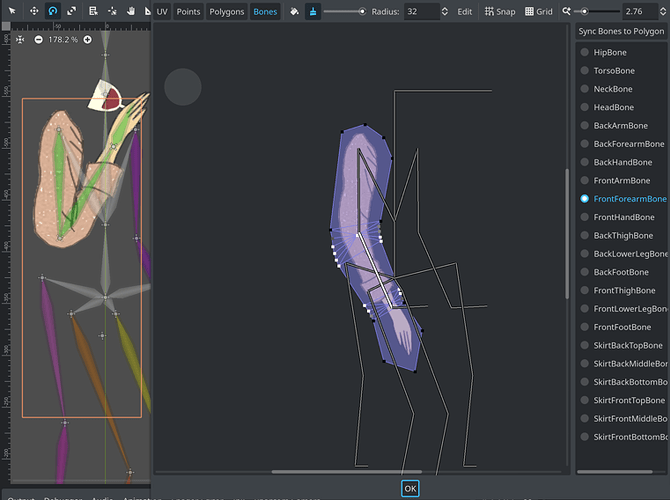
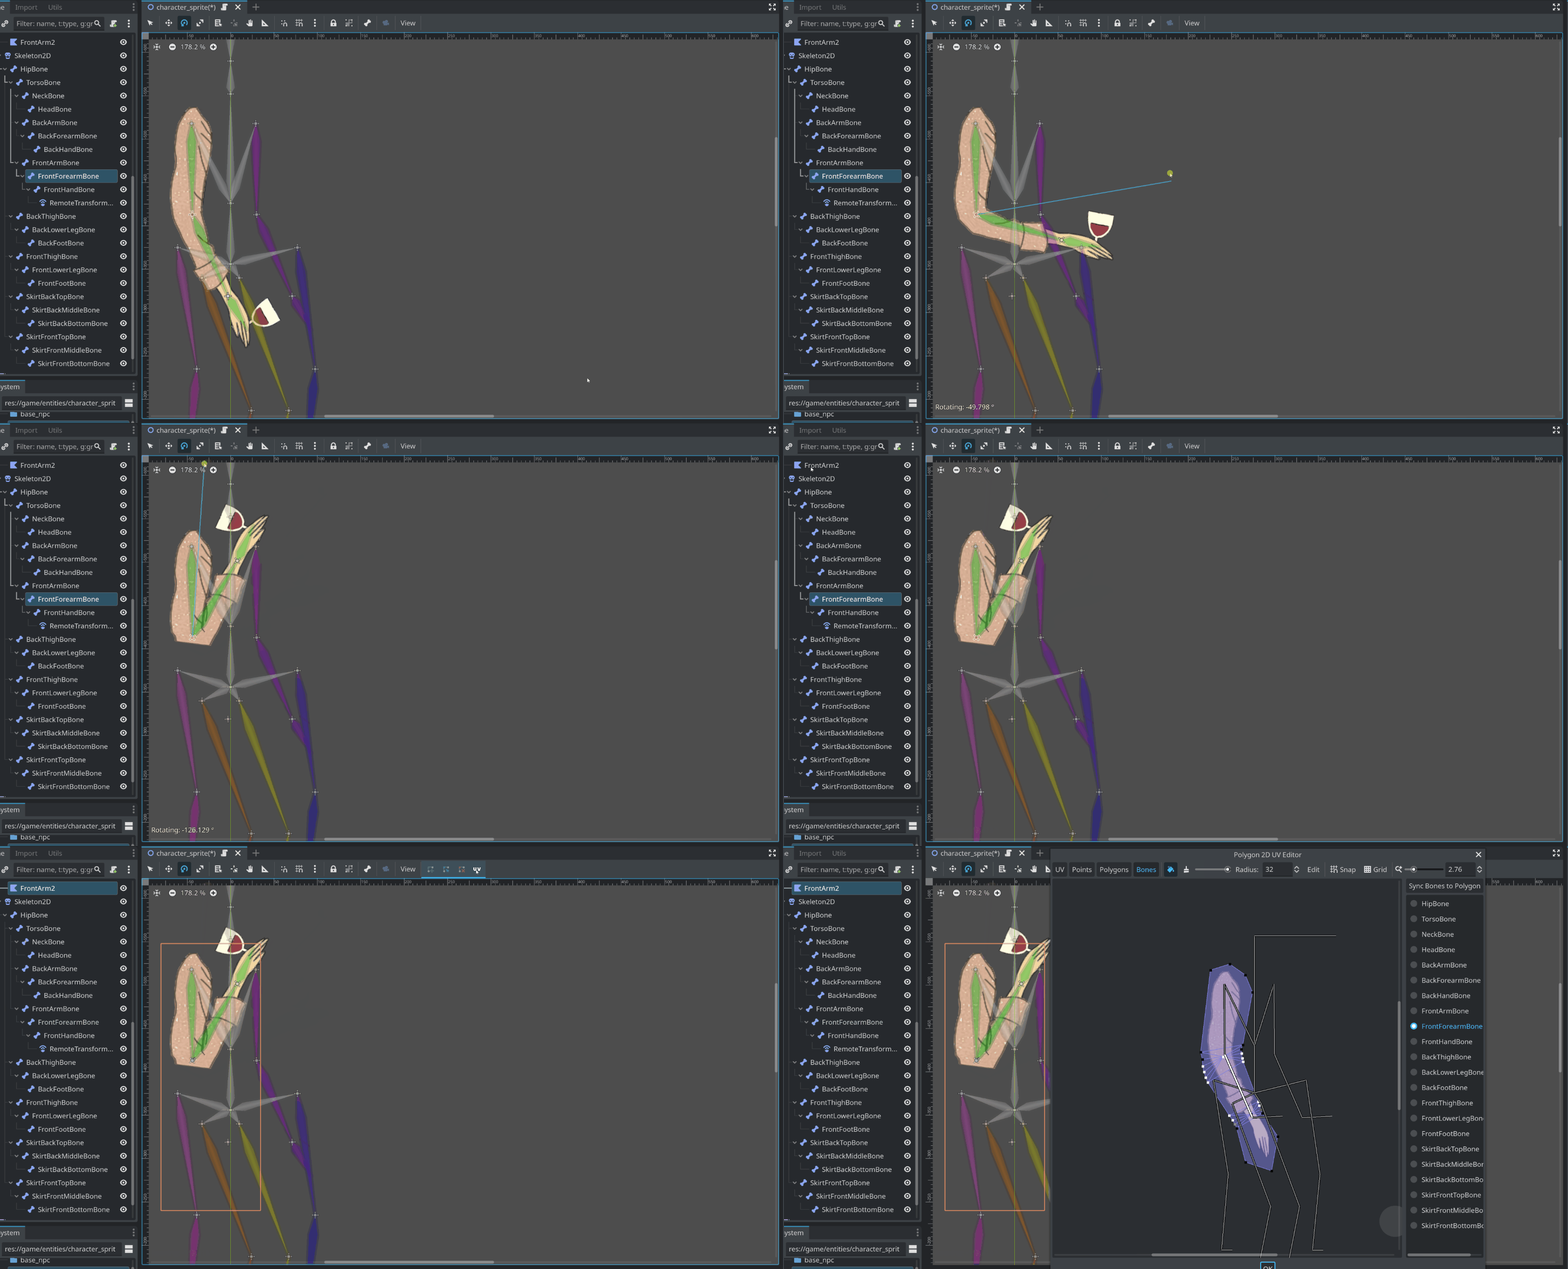
Workflow: Rotate the bone in the edited scene to a problematic transform, then open the UV editor, move the window to the side so you can see your polygon in the scene, and experiment with bone weights in real time.
In this example, we need to rotate the elbow far past 90 so the character can drink her wine (the wine glass will get rotated separately). So we rotate the bone to the most extreme rotation we will need, then open the editor and adjust the bone weights.
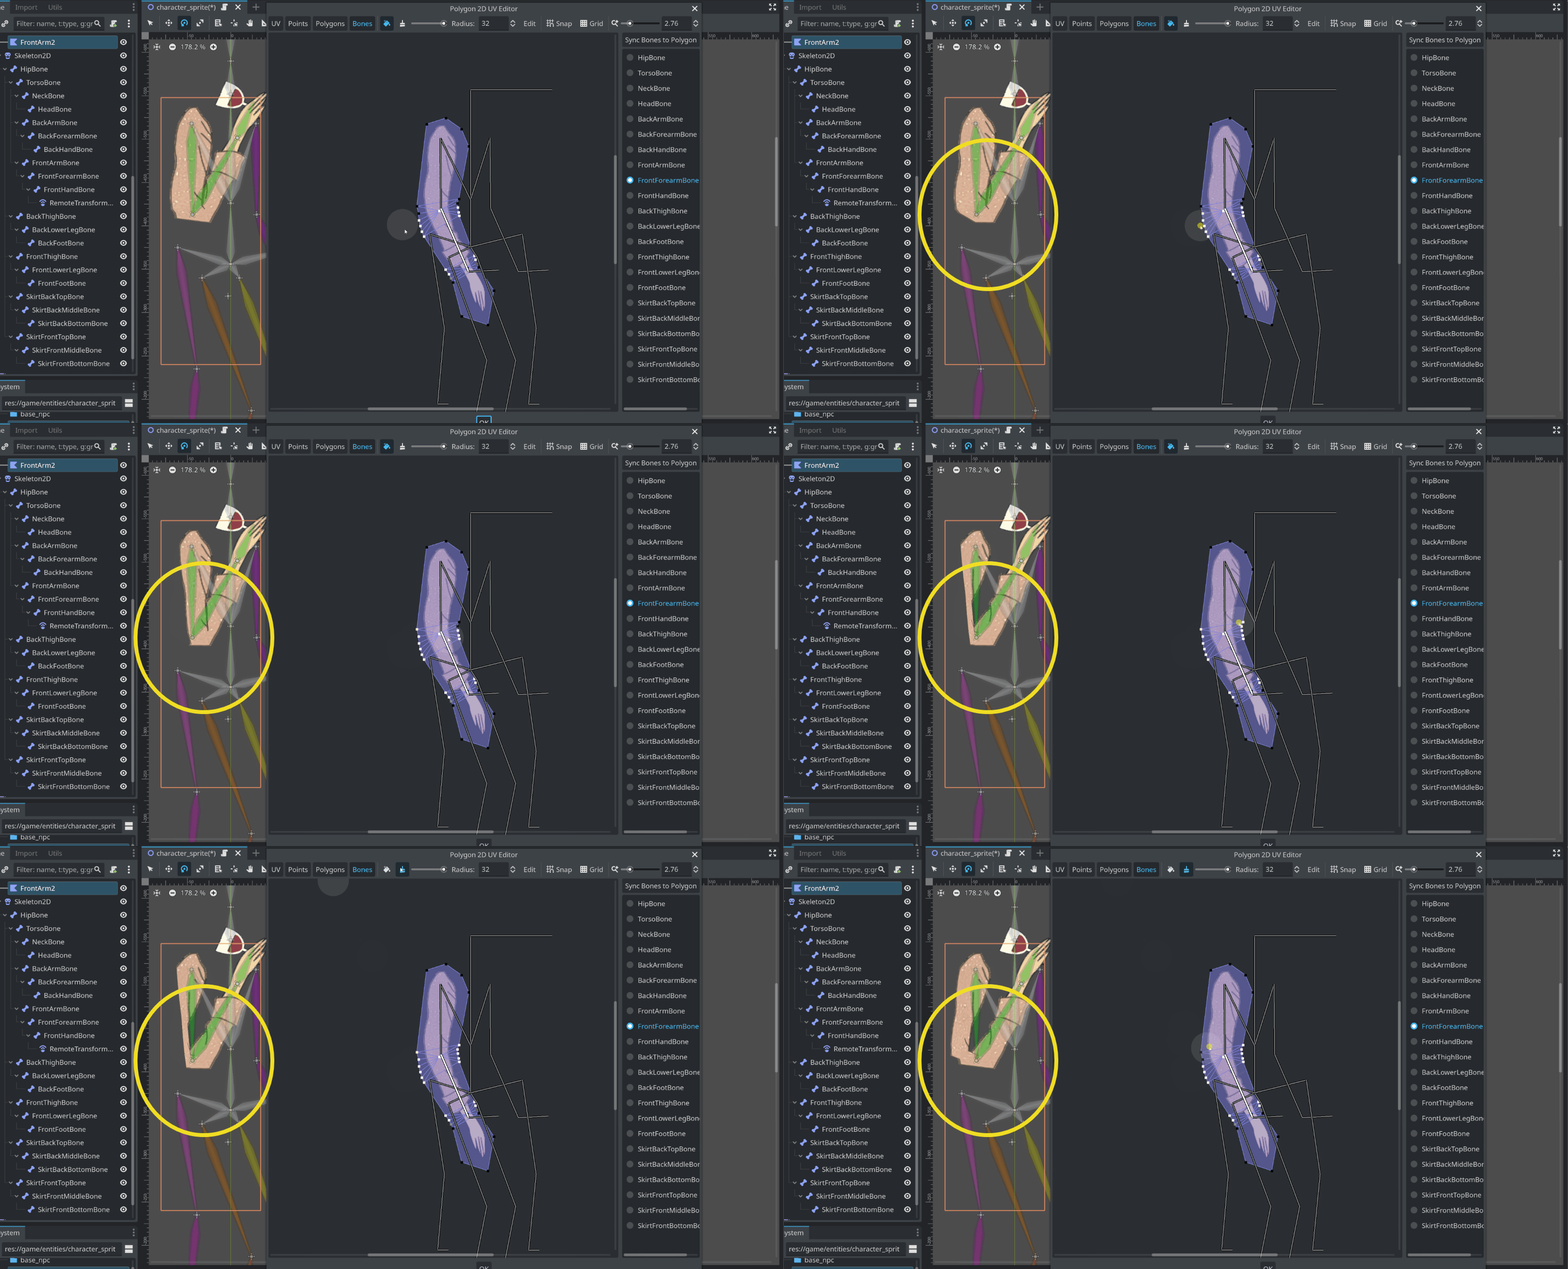
Note that the Polygon2D editor doesn’t show fine differences between bone weights visually, and can look fully white or black (on or off) when there’s still partial influence. In addition, painting with partial weight strengths appears to maybe be multiplicative rather than additive (???) (edit: I don’t think that’s true on further reflection. But I’ve had some tiny residual bone weights that are difficult to fully remove.). So precision can be tricky, and if you want to fully erase a bone’s influence from a vertex, make sure the eraser tool is set to full strength.
Here are screenshots of the final results. It’s not perfect, but it was good enough for this low fidelity animation. You can see it’s difficult to tell from the white-gray-black colors representing bone weights the painstaking but tiny differences between the actual weights at different vertices.
In this case, where each arm and leg was a separate Polygon2D with identical textures for each side, it would have been impossible to re-create the exact bone weights in such detail manually. So I set up the full Polygon2D with bone weights for one side, duplicated it, and then swapped the bones assignments using the following tool script (which anyone is welcome to take and use however they want).
You should also be able to do this by manually editing the scene’s .tres file, but I found it too tricky to find the correct lines to edit.
@tool
extends Polygon2D

@export var from_bone : Bone2D
@export var to_bone : Bone2D
@export var swap : bool = false :
	set(value):
		swap_bone_weights()


func swap_bone_weights() -> void:
	if not from_bone or not to_bone:
		printerr("Missing bones")
		return
	if not skeleton:
		printerr("No skeleton assigned")
		return

	var from_bone_path := get_node(skeleton).get_path_to(from_bone)
	var to_bone_path := get_node(skeleton).get_path_to(to_bone)

	var from_bone_index : int
	var to_bone_index : int

	var from_bone_weights : PackedFloat32Array
	var to_bone_weights : PackedFloat32Array

	for i in get_bone_count():
		var path := get_bone_path(i)
		if path == from_bone_path:
			from_bone_index = i
			from_bone_weights = get_bone_weights(i)
		elif path == to_bone_path:
			to_bone_index = i
			to_bone_weights = get_bone_weights(i)

	print("from bone: %s" % from_bone_weights)
	print("to bone: %s" % to_bone_weights)
	set_bone_weights(to_bone_index, from_bone_weights)
	set_bone_weights(from_bone_index, to_bone_weights)
	print("bone weights successfully swapped")
More control over the deformations
To protect a region of the polygon from being deformed, make sure all its vertices are assigned to the same single bone (or its descendents), and be careful about where the pivot is located.
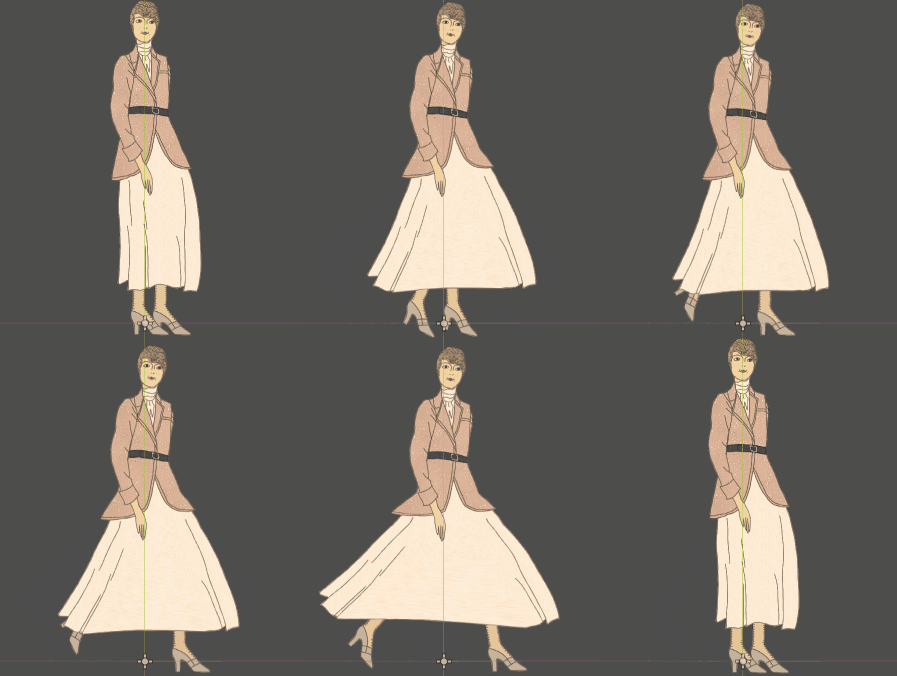
For example, here is a skirt. It needs to be stretched horizontally for a walk cycle. The line art isn’t anything special in an idle pose, but it will look really bad if the vertical fold lines are stretched horizontally. So I assigned the bones like this, carefully avoiding overlap between the front and back bones of the skirt.
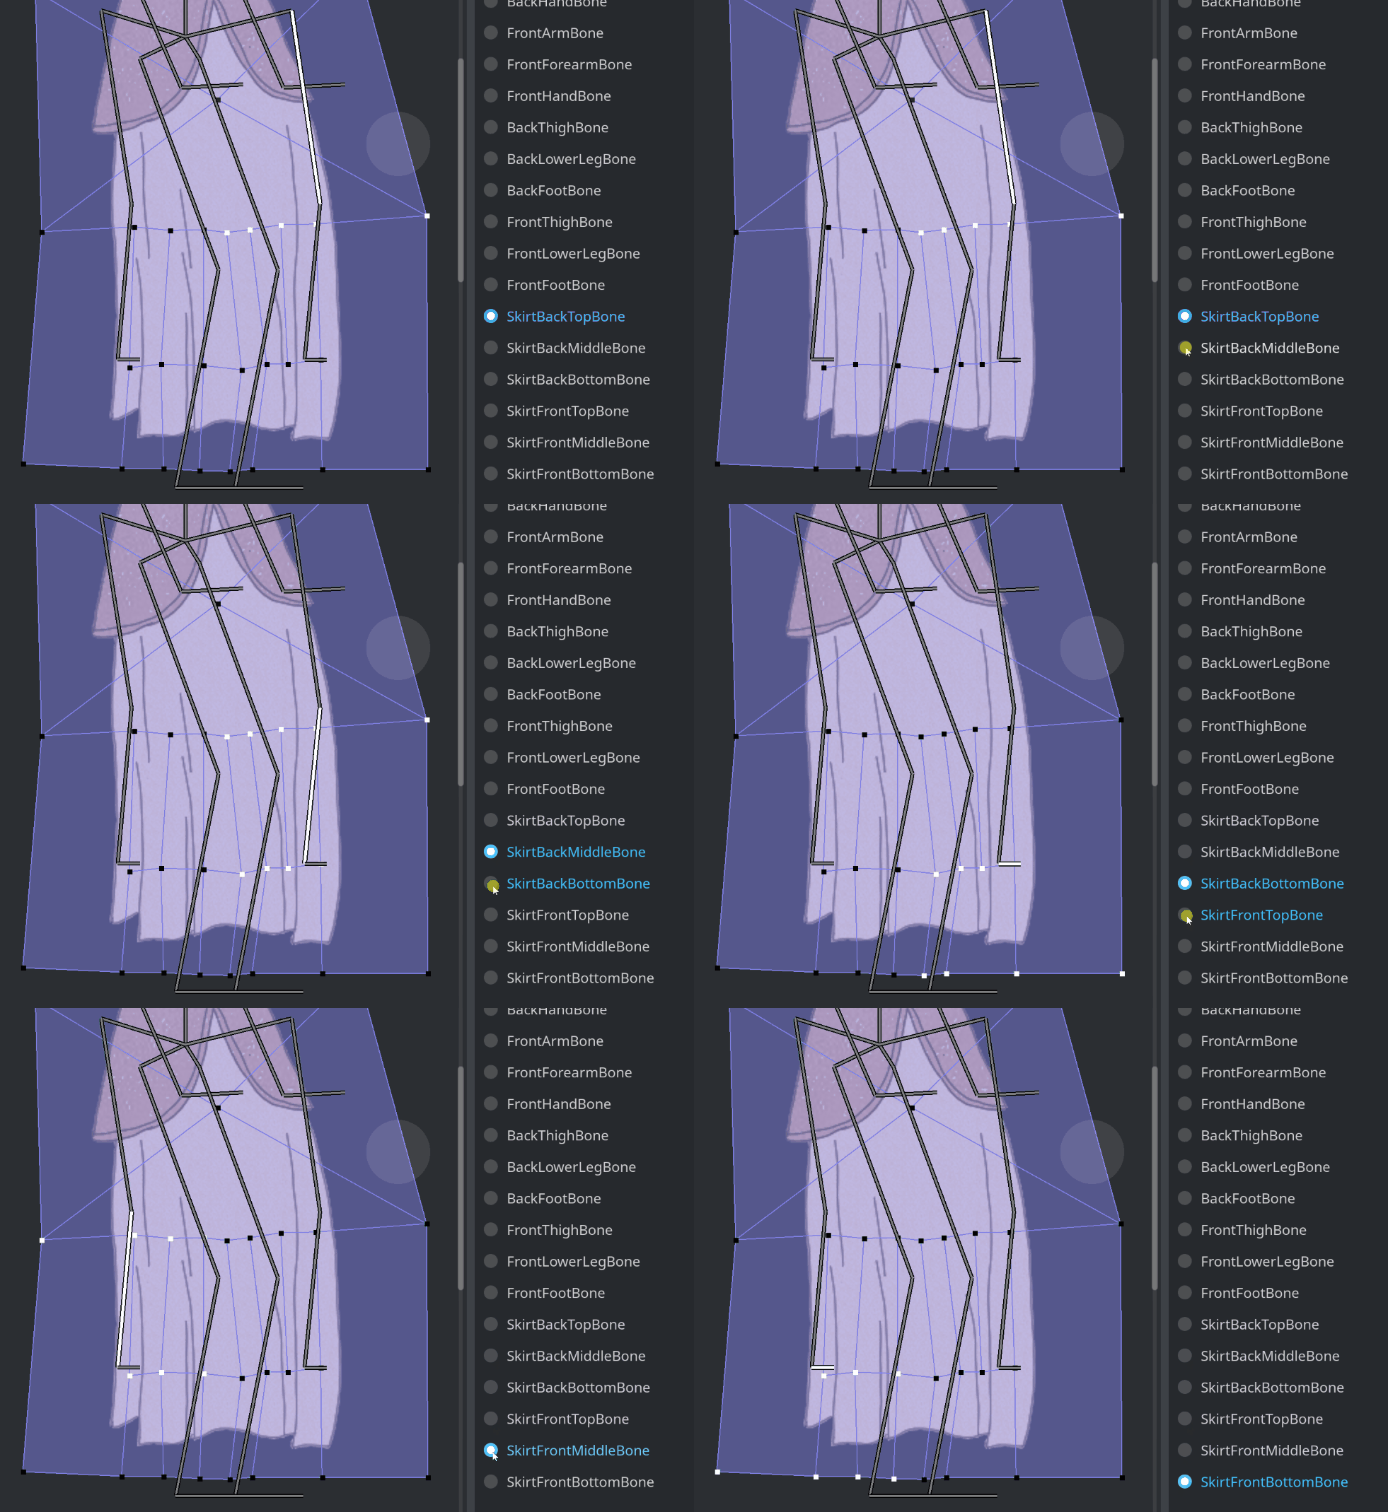
Here’s how it deforms in a walk cycle (slowed down in the middle):
And in two different sit animations:
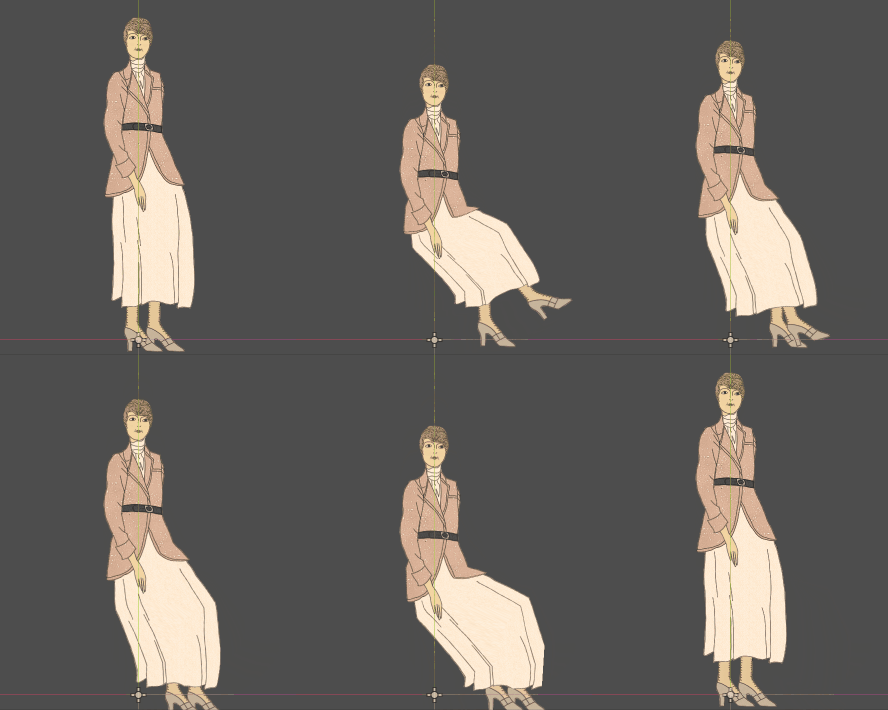
This low fidelity animation was good enough for my purposes at the time. A higher fidelity animation should be possible with more time and effort.
Appreciate any feedback on this post and, again, any tips/tricks/corrections from more experienced users are very welcome!
Footnotes:
(1) Keeping the offset centered causes significant bugs later on lining up your bones and UV; though, I believe there’s a PR that will fix this.
(2) Theoretically, the editor should keep bone assignments when unassigning/reassigning the skeleton, but I’ve found that the bone weights do actually get deleted in the process.
